
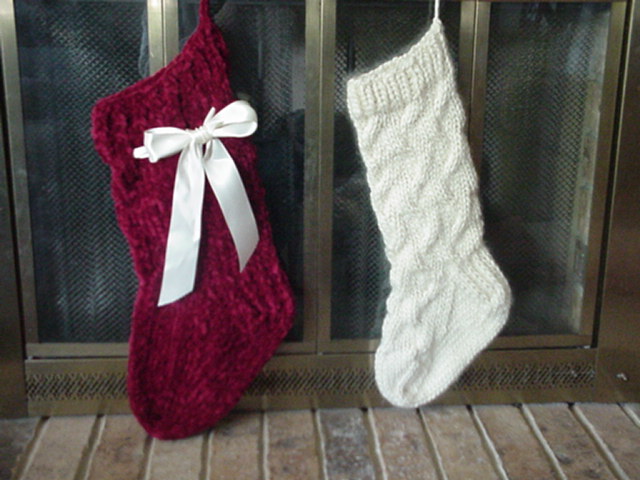
 (These directions are for the red stocking shown on the left in the photo. To make the off-white stocking shown on the right in the photo, go here.)
Make a Christmas Stocking in an evening, using large needles and super bulky yarn! The stocking shown here was made with Lion Brand Chenille. Add a satin ribbon bow, and it is a quick sock decoration to hang on the front door!
This is a great pattern to learn how to knit socks, as it uses all of the techniques for a "basic sock". As an added bonus, there is no "second sock syndrome" with Christmas stockings!
(This pattern is the property of YarnThrower and may not be reproduced except for one copy for individual use. If you print or distribute this pattern without YarnThrower's written permission, you are stealing.)
Finished Dimensions:
- Red Stocking shown is 8 inches wide by 19 inches long
- One skein Lion Brand Chenille Thick & Quick, or Wool-East Thick & Quick, or any super-bulky weight yarn (category 6) which knits up at about 8 or 9 stitches per four inches in stockinette.
- Set of four size 13 double pointed needles
- Size 13 circular needle, 16 inch (optional -- may use double pointed needles throughout, or may cast stitches onto circular needle and knit most of the sock on the circular needle, though double pointed needles will still be needed at the heel and toe)
- Darning needle
- Scissors
- Two yards of 2 inch wide satin ribbon
Cast On:
- Holding two double pointed needles together, cast on 36 stitches tightly over both needles. Carefully pull out one of the needles. This will yield a loose, uniform cast on edge.
- Divide stitches evenly onto three needles. You will have 12 stitches per needle.
- Place marker and join to work in the round, knitting one row. (Note that the first 12 stitches knit are on needle #1, the next 12 stitches knit are on needle #2, and the last 12 stitches knit are on needle #3.)
- Work in K1 P1 ribbing for five rows.
Leg:
- Knit three rows in stockinette.
- On fourth row, *K1, YO, K2tog*, repeat between *__* to end of round. There should still be 36 stitches total on needles.
- Continue in stockinette stitch until work measures about 12 inches, stopping at end of round.
Heel Flap:
- Arrange stitches on needles so that needle #1 has 18 stitches, and needles #2 and #3 have 9 stitches each. The heel will be worked back and forth on needle #1.
- Row 1: *Slip one stitch as if to purl, K1*, repeat section between *__* until the end of needle #1, turn work.
- Row 2: S1, purl across, turn work.
- Rows 3-9: Repeat rows 1-2, ending with row 1.
(Note that when you turn work on rows 1-5 you will not be at the end of the row.)
- Row 1: P11, P2tog, P1, turn work.
- Row 2: S1, K5, K2tog, K1, turn work.
- Row 3: S1, P6, P2tog, P1, turn work.
- Row 4: S1, K7, K2tog, K1, turn work.
- Row 5: S1, P8, P2tog, P1, turn work.
- Row 6: S1, K9, K2tog, K1.
- Pick-up round (Row 1): Pick up and knit 9 stitches along right edge of heel flap. Combine instep stitches (those stitches on needles #2 and #3) onto one needle by using a free double pointed needle and knitting across the 18 instep stitches. Using the needle which was just freed up, pick up and knit 9 stitches along left edge of heel flap. Continue knitting with this same needle and knit 6 stitches from the heel. You are now at the center back, end of round. Move next 6 stitches onto needle #1. Needle #1 should have 15 stitches on it, needle #2 should have 18 stitches on it, and needle #3 should have 15 stitches on it, with yarn end between needle #1 and needle #3.
- Row 2: Knit around.
- Row 3: Decreasing round -- Knit to last three stitches of needle #1, K2tog, K1. Knit across needle #2. On needle #3, K1, SSK, knit to end of needle.
- Repeat row 2 and row 3 until 36 stitches total in round. Needle #1 and needle #3 will each have 9 stitches, and needle #2 will have 18 stitches.
- Knit in stockinette until foot part is 5.5 to 6 inches long from picked up edges, stopping at end of round.
Toe:
- Row 1: On next round, knit to last three stitches of needle #1, K2tog, K1. On needle #2, K1, SSK, knit to last three stitches, K2tog, K1. On needle #3, K1, SSK, knit to end of round.
- Row 2: Knit around.
- Repeat rows 1 and 2 until there are a total of 16 stitches remaining, stopping at end of round.
- Continue knitting with needle #3, and knit 4 stitches from needle #1 onto needle #3. You should now have two needles, each with 8 stitches.
- Cut yarn leaving an 18 inch tail, and use Kitchener Stitch to close toe.
- Weave in all ends.
- Add a crochet chain or I-cord for hanging stocking.
- Weave Satin Ribbon through eyelets formed by Step 2 of leg section, and tie it in a nice bow.
26 comments:
This looks like a great pattern. I'm planning to make it a little larger and use up my colourful scraps. It's for my 83 year old Mum who will be spending Christmas with us this year. I'll let you know how it turns out. Thanks, Gillian
I just knit two of these up for my husband and I - one in red and one in green. Great pattern, and easy to follow!
Hi there! I just bought a few skeins of the Lion Brand Thick and Quick chenille yarn (to make a few of these stockings), and I discovered that one of the skeins is only 75 yards (the other are 100). Will that be enough for this pattern? I'm a beginning knitter, so I have no idea how to tell. Eep!
Hmmm... I tried to find the yarn I had leftover from making the stocking, and I wasn't able to locate it, though I had a solid color, so I'm pretty sure it was about 100 yards or so...and, I don't think I had very much left over. My hunch is that 75 yards will not be quite enough. However, you might try using one of your 100 yard skeins first, and measure how much you have left over. Subtract that number from the yardage of the original skein, and you will then know how much yarn it took to knit the sock. If you find that 75 yards will not be enough, you might try making a stocking with stripes, or making your toe and heel in a contrasting color. I hope this helps! Good luck, and thank you so much for your note!
Thanks so much! I'm working on the 100 yard one now, and it's going well so far (hooray for the internet- I can find diagrams for everything!). I love the pattern so far.
I did have another question- on the heel flap, row 1, when it says to slip one stitch as if to purl, is that with the yarn in front or in back (or does it not matter)? And will I be knitting it on to one of the needles with yarn on it, or a free needle?
Sorry for all the questions, and thank you so much for your help! This is my first non-scarf project, and I'm having fun!
I'm so glad things are going well for you with the pattern so far. Please feel free to alert me if you notice anything odd.
Definitely slip the stitch with the yarn in back of the work. It would make a difference if you did it with the yarn in front, because you'd get little horizontal "lines" of yarn in front of every slipped stitch.....and you want those to be running on the wrong side (purl side), not the right side (knit side). Also, I would knit it onto a free needle.
Don't worry about asking too many questions! I'm so glad if I can help! You're ambitious for making a sock as your first non-scarf project, what with the four needle thing and knitting in the round and everything! That's really great!
Laura
Thank you so much for all your help and patience!
I definitely understand now about the knit versus purl side... I was wondering which side I was knitting on! I have to admit that I cheated, though... I knit the leg in the round on circular needles. I couldn't handle 3 separate ones at once for that long.
I'm so glad to find so many fun patterns here! I've been sewing and card weaving since I was very little, and I come from a family of knitters and weavers, so perhaps I'm hoping that I've learned something through osmosis!
(finally revealing myself :))
In row 3 on the Gusset what does SSK mean? This is my first project - going well.
Hi. I'm working on the heal flap of this stocking. I got through row 1 with the slip stitch. I am on to row 2. I don't know what S1 means? I assumed it was 'slip one', but I looked it up in my book, and the abbreviation for slip is 'sl'. Can anyone tell me what 'S1' stands for? Thanks.
:) erika
I am wanting to knit a stocking with cable stitch...how would i add that to this pattern? I have never knitted before, would that be too much for my first time?
I used this pattern last year to make a mini version (using worsted weight and smaller needles), and it was so easy! I searched and searched to find this pattern again (so I can make christmas stockings for my family) and was so relieved to find it! THANK YOU for making it so easy to follow. The stocking I did last year was my first "sock" ever, and I had no problem following the pattern. I've tried looking at other patterns and they make no sense to me. So, again, thank you for making such an easy and easy to follow pattern!
What does the abbreviation "YO" mean at the beginning of this pattern? I'm just beginning, and someone who called himself a master knitter said I use the "English" style (rather than the "continental" or "American", I suppose). Does that make a difference with this pattern and the terminology/techniques used?
Sorry my reply has taken so long. Life gets in the way of blogging sometimes... In any case, YO would be the same regardless of which knitting style you use. Simply bring the yarn up between the needles and put it on the opposite side of the work from where it started. For example, for the red stocking, your working yarn is carried in back of the work. To "YO," which is an abbreviation for "Yarn Over," simply bring the yarn to the front of the work, then continue working the rest of the row. What this ends up doing is giving you and extra stitch on your current row, and when you work the subsequent row, it will leave a little "hole," which will later be used to thread the ribbon through. I hope this helps! Good luck!
I am making this stocking for my daughters new puppy. I wanted something fast and simple and boy this fits the bill. I have been knitting for about 3 hours and all I have left to do is the toe. Nicely written pattern. I used the thick and quick yarn, creamy white for the cuff (I doubled the ribbing, so I can turn the cuff) and cranberry for the body of the stocking. I left off the eyelet row, after all Harley is a boy, no bow. I am going to stitch his name on the finished stocking. I will have enough yarn left to make another stocking as well, perfect. Thank you, for making this pattern available.
I can't find anywhere what S1 is? Can you please tell me? Thanks
"S1" means "slip one". You simply are moving one stitch from your left needle onto your right needle (if you are right handed) without working it, and in this case, you slip it as if you were going to purl it (but without *actually* purling it).
This REALLY MAKES ME WANT TO LEARN TO KNIT--I'm 52 (almost) I don't think I have a snowballs chance in Hell to learn, but I love the stockings!
poroucieedwonOh you must pursue knitting! I just turned 61 and only started 2 years ago and I'm working on my 8th sweater with a lot of scarves, hats, vests, and several baby dresses, blankets, etc. in between! You are never to old to learn! Btw I just started on this stocking pattern for my grand-daughter. Very pretty!
Certainly I like your web site, however you have to take a look at the spelling on several of your posts. Several of them are rife with spelling issues and I find it very troublesome to inform you. Nevertheless I'll surely come again again!
Great pattern, spelling is fine I am not a teacher who is going to grade errors. Needed a good pattern for my upcoming grandson's first Christmas and this with the pretty pattern fits the bill!!
PS: To those not sure if they can learn to knit!! Do not hesitate to try as there are many resources to learn both on the internet and in yarn shops. There are videos online even that are free tutorials that you can play and replay as needed. Knitting and crochet are fun and not as hard as it looks when you get into it.
I'm not sure I understand about the gusset part on the Christmas stocking. Could someone help me or refer me to a utube instruction?
If you google "sock gusset," it will bring up several links to YouTube videos on this topic. Also, you may want to check your local library for sock knitting books - there are some books which have very nice photos which might help you with this. Best wishes!
Laura
I just want to thank you for this pattern. I have used it a lot (and made variations of my own based on this one). Thanks! :)
there are a few online sites where u can buy brandable clothes and shoes, my favourite one is site reduceri
Worked pattern to gusset. I cant understand how i go from 36 at end of heel flap and 30 after turn heel to 33 for gusset. Cant see how to make it work? Do you have this pattern for circular needle magic circle?
Post a Comment