
Lily’s Hat


A Pattern by Designated Knitter
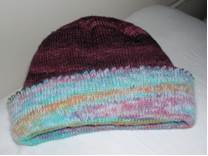
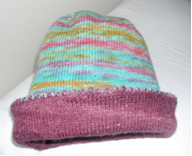
This hat is knit from the tip to the brim, then the color changes and is knit from the brim to tip! It can be knit with a striping yarn on one end and a solid on the other, or with two solids or two coordinating stripes.
(This pattern is the property of DesignatedKnitter and may not be reproduced except for one copy for individual use. If you otherwise print or distribute this pattern without DesignatedKnitter's written permission, you are stealing.)
Materials:
Lucy Neatby Celestial Merino (1) skein stripe and (1) skein solid
Set of (5) double-pointed needles, size 3
16” circular needle, size 3
(4) stitch markers
Darning needle
Gauge: 8 stitches per inch on #3 needles or size needed for guage.
Finished hat is 17” around and 8” long.
Directions are for size 6-18 months. (The hat can be made larger, but requires a second ball of solid yarn.)
In order to make increases, knit in the front and back of each stitch (K1fb). Each increase row will add 8 stitches and each decrease row will decrease 8 stitches.
Hat can be made larger or smaller by making more or less increases. Basically, increase until the hat is the circumference that you want.
For size 0-6 months, increase to 120 stitches.
For size 18 months – 4 years, increase to 152 stitches.
For size 4 years to adult S, increase to 160 stitches
For size adult M, increase to 168 stitches
For size adult L, increase to 184 stitches.
When working different size than pattern, when you are ready to decrease, divide work onto 4 dpns and place markers in the middle of each dpn. Start directions for decrease on Row 3
Cast on 8 stitches and arrange on (4) dpn, 2 stitches per needle. Join, being careful not to twist.
Work increases as follows:
Row 1: On each needle, K1fb, place marker, K1fb
Row 2: (and all even numbered rows)K around
Row 3: On each needle, K1fb, K to marker, K1fb, K to end of needle.
Alternate Row 2 & 3 until there are 136 stitches.
Switch to circular needle, and continue in stockinette stitch until you have knit an additional 7” (longer if you are doing a larger hat!)
Color change row:
K2TOG, yo around.
Join solid yarn.
Continue in stockinette stitch for 7”. (Or the same length as you did the stripe!)
Work decreases as follows:
Row 1: With dpn, K2tog, K 15, place marker, K2tog, K to end of needle. Switch to next needle, and repeat process 3 more times.
Row 2: K around
Row 3: On each needle, K2tog, K to marker, K2tog, K to end of needle.
Alternate Row 2 and 3 until 8 stitches remain.
Cut 6” tail, and draw tail through remaining 8 stitches and pull closed.
Weave in end.
Gauge: 8 stitches per inch on #3 needles or size needed for guage.
Finished hat is 17” around and 8” long.
Directions are for size 6-18 months. (The hat can be made larger, but requires a second ball of solid yarn.)
In order to make increases, knit in the front and back of each stitch (K1fb). Each increase row will add 8 stitches and each decrease row will decrease 8 stitches.
Hat can be made larger or smaller by making more or less increases. Basically, increase until the hat is the circumference that you want.
For size 0-6 months, increase to 120 stitches.
For size 18 months – 4 years, increase to 152 stitches.
For size 4 years to adult S, increase to 160 stitches
For size adult M, increase to 168 stitches
For size adult L, increase to 184 stitches.
When working different size than pattern, when you are ready to decrease, divide work onto 4 dpns and place markers in the middle of each dpn. Start directions for decrease on Row 3
Work decreases as follows:
4 comments:
Love the idea....it looks like it would be very warm. Can't wait to try it. Thank you for sharing.
Congratulations on getting over 1200 hits on your blog in one day!!!! Soon you will rival the great blogs of the Yarn Harlot, or Mason Dixon Knitting. Just remember us faithful readers when you're famous, Thanks. ;-)
I love the pattern. I am making the hat for my granddaughter.
It has been a long time since I made reversible hats for my children, in their school colors or in two school's colors, one inside and one outside. Such a fun idea. I had forgotten how many stitches to cast on for a toddler's hat. Thanks for the pattern for my granddaughter.
Love this one, but does anyone have a pattern for baby baseball cap? It can be knot or crochet. Thanks
Post a Comment