
 A pattern by YarnThrower
The creative process is not without risks. Occasionally a finished project falls short of an idealized vision for how it is supposed to look. A few years ago, I made a sweater that couldn't have been less flattering on me. I thought that slightly shrinking it would make it look better, but all it did was to make it impossible for me to unravel and reclaim the yarn. And so, I decided to try an experiment to turn it into something completely different. I felted the sweater until it would shrink no more, made some strategic cuts, sewed a couple of hems, added some notions from my local fabric store, and tried my hand at needle felting. And so was born these Oopsy Daisy bags. Try these techniques with your own sweater which might be too big, or which might have been accidentally shrunk in the wash, or use an old wool sweater from a second-hand store.
(This pattern is the property of YarnThrower and may not be reproduced except for one copy for individual use. If you print or distribute this pattern without YarnThrower's written permission, you are stealing.)
FINISHED MEASUREMENTS:
Varies, depending on the size of sweater and the amount of felting. The Oopsy Daisy Satchel Bag shown measures 17 x 12 x 4 inches (without handles).
MATERIALS:
- Any sweater which has been made using fiber which can be felted
- 2 to 3 yards of feltable yarn which matches sweater, to sew bottom closed
- Pillow case, preferably one with a zipper closure
- Sewing shears
- Sharp tapestry needle
- A few yards yarn for hemming edges, matching or contrasting nicely with sweater
- Sharp hand-sewing needle
- Thread to match sweater
- Felting needle
- Foam (to use underneath "fabric" when needle felting)
- Assorted scrap bits of yarn, of any material including novelty, whatever you have
- Chalk pencil (optional)
- Serger or sewing machine (optional)
- Set of two oval purse handles, 5 x 8 inches
Whatever gauge your finished sweater has will be fine. Mine was made of worsted weight yarn, having a gauge of 4.5 stitches per inch before felting.
PATTERN:
- With wrong sides together, and using a loose overcast stitch which catches only the very edges of the fabric, attach front to back of sweater at lower edges using matching feltable yarn and a sharp tapestry needle, completely closing off the bottom.
- Place sweater into pillow case, zip or tie it closed, and place it in washing machine. Start washing machine with it set for longest cycle, hot water, and maximum agitation. Just before washing machine goes into spin cycle, check the sweater to see how much it has felted. If desired, reset the washing machine to the beginning of the agitation cycle and start it again. When sweater has felted the desired amount, allow washing machine to complete its cycle. Remove sweater from pillowcase and lay flat to dry.
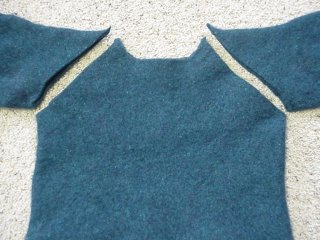
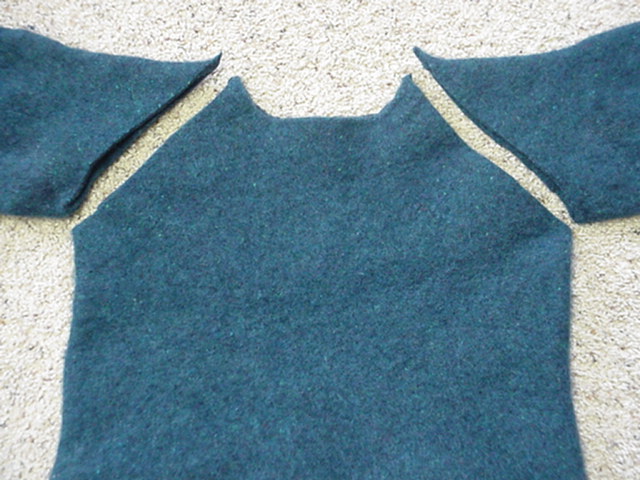
- After sweater is completely dry, make two cuts using sewing shears. Each cut will go from the underarm and diagonally up to the side edge of the neckline, as though following along an imaginary raglan sleeve line. Also cut the back neckline to follow the same curve as the front neckline does.
- Using the body of the sweater, fold the edges (from where the sleeves were cut) 0.5 inches to the inside. Overcast stitch them in place using sharp tapestry needle and matching or contrasting yarn.
- Using a serger, or a sewing machine zig-zag stitch, or an overcast stitch by hand, edge-finish the neckline cut edges of the sweater. This will give the fabric edge more stability (especially the back edge, where the cut was made to make it match the front) and help prevent the fabric from tearing.

- Folding front neckline edge over one side of an oval purse handle, and using sharp hand-sewing needle and matching thread, sew neckline edge to inside of bag, allowing enough of a casing for the purse handle to move slightly, but not too much. Repeat with the other purse handle along the back neckline edge.
- Turn bag inside-out. On one lower corner, bring long center line of bag bottom to meet long center line of side, forming a point at the corner. Mark a line 2 inches from the corner point, and stitch across this line, forming the base of an isosceles triangle in which the bag's corner point is at the top. This gives the bag some width.
 (Then, and optionally, fold the corner point to bottom inside of bag and stitch in place using matching thread and sharp sewing needle.) Repeat on other lower corner.

- Turn bag right-side-out. Insert foam into bag, behind area which will be needle-felted. (Optional: On right side of bag, use chalk pencil to draw an outline for the picture which will be needle-felted.) Place scrap of yarn onto bag surface. Using felting-needle in one hand, and holding scrap yarn or a knitting needle to guide the scrap yarn with the other hand, poke scrap yarn straight down, through yarn and bag, in a couple of places to tack it down. Continue tacking various scrap yarn pieces to form desired design. Then, securely fasten all of the scrap yarn by really poking away at it until all of the yarn is firmly attached to the bag and the desired look has been achieved.
- Feel free to finish off the Satchel Bag by adding a pocket inside made from part of one of the sleeves, or from a nice fabric. This bag would also be quite easy to line with a fun print fabric.
1 comment:
Thanks for the easy to follow instructions. I made my first felted purse last night.
Post a Comment