
 A pattern by YarnThrower
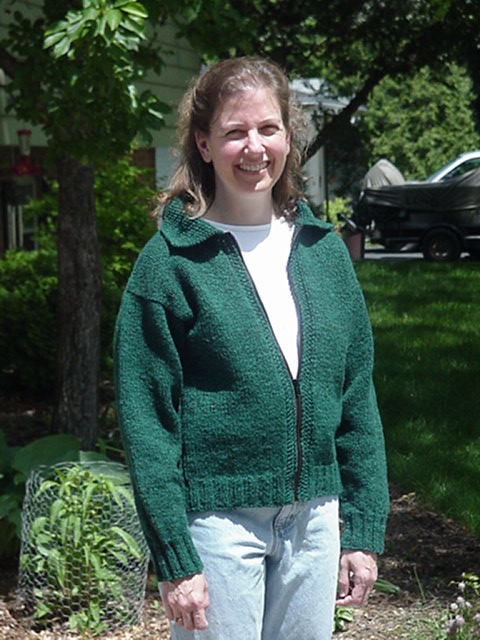
This is a basic bulky cardigan. It has ribbing under the arms for subtle shaping, modified drop shoulders, and a collar. Feel free to explore your own creative genious by using this pattern as a "blank sheet" to embellish with stitch patterns or color work, or just make it plain, as I did, using a nice yarn. It is perfect for a fall jacket, and the bulky yarn makes it very warm.
It is knit with the front bands, fronts, and back as one piece from the lower edge to the underarms. Then some stitches are cast off for sleeve insets, and the fronts and back are
 knit separately up to the shoulders, then attached at the shoulders with three needle bind-offs. Sleeves are picked up from the armhole edges and knit down from the shoulders, first back and forth for a couple of inches in the inset area, and then joined to knit in the round down to the cuff. The collar is picked up and knit from the neckline. The only finishing on this sweater is weaving in the ends, sewing a four inch seam in the underarm area of each sleeve, and installing a zipper. Directions for sewing a zipper into a cardigan may be found here.
(This pattern is the property of YarnThrower and may not be reproduced except for one copy for individual use. If you otherwise print or distribute this pattern without YarnThrower's written permission, you are stealing.)
Finished Size: This sweater, as shown, has a 40 inch chest measurement.
 Since this is a free pattern, and since I don't know what the interest in it will be, I have not worked out the math for other sizes. However, if you are interested in a particular size, send me an e-mail with your wishes, and I'll see what I can do.
Updated 10/29/2006: To include directions for a 54 inch circumference (2x).
Materials:
- Blackberry Ridge Nubby Wool (bulky weight, approximately 185 yards per 4 oz), 6 hanks. (Not sure how much would be required for the 54 inch (2x) size.)
- 20" separating zipper to coordinate with yarn (24" zipper for larger size)
- Circular, 16 inches for upper sleeves, size 8
- Circular, long enough to hold 166 (226) stitches for body (worked back & forth), size 8
- Circular to hold 150 (204) stitches for lower body ribbing (worked back & forth), size 6
- Double pointed needles for lower sleeves cuffs, size 6
- Double pointed needles for lower sleeves above cuffs, size 8
- Darning needle
- Scissors
- Tape measure
15.5 stitches and 25 rows to 4 inches in stockinette
Pattern:
Body of sweater:
- Using size 6 circular needle, cast on 150 (204) stitches.
- Row 1: K1, P1, K1, P1, *K2, P2*, repeat area between ** until last six stitches, then K2, P1, K1, P1, K1.
- Row 2: K1, P1, K1, K1, *P2, K2*, repeat area between ** until last six stitches, then P2, K1, K1, P1, K1. (Note that this sets up a seed stitch border along the front edges that spans three stitches on each side, and a one-stitch "channel" next to each border, and 2x2 ribbing along the rest of the lower edge of the cardigan.)
- Repeat rows 1 and 2 until 16 rows have been completed, increasing 16 (22 -- space 12 of these within the back section, and place the remaining 10 within the front sections (5 within each front)) stitches evenly spaced in row 16 (making sure that these increases aren't made within the 14 (18) stitches under each arm -- the ribbing in this area will continue up to the armhole). Now there will be 166 (226) stitches on the needles.
- Change to size 8 circular needle.
- Next row (right side): K1, P1, K1, P1, K30 (43), place marker, P2, K2, P2, K2, P2, K2, P2, (add K2, P2 for larger size) place marker, K70 (96), place marker, P2, K2, P2, K2, P2, K2, P2, (add K2, P2 for larger size) place marker, K30 (43), P1, K1, P1, K1. (The two P2 K2 sections, which are between markers, set up the ribbing under the arms, which is continued all the way to the armholes.) (Note that at this point, there are two fewer "front" stitches than there are back stitches. This is to allow for the space the sewn in zipper will take up.)
- Next row (wrong side): K1, P1, K1, K1, P30 (43), slip marker, K2, P2, K2, P2, K2, P2, K2, (add K2, P2 for larger size) slip marker, P70 (96), slip marker, K2, P2, K2, P2, K2, P2, K2, (add K2, P2 for larger size) slip marker, P30 (43), K1, K1, P1, K1.
- Repeat these two rows until work measures 13 inches (14 inches, or desired length to armholes) from cast on edge, ending with a wrong side row.
- Next row, divide for fronts and back: Work across 34 (47) stitches as established, place these 34 (47) stitches on holder (scrap yarn), bind off 14 (18) ribbing stitches (for bottom of armhole), work across 70 (96) stitches, place remaining 48 (65) stitches in row on another holder.
- Back: Knit stockinette (knitting on right side rows, purling on wrong side rows) on 70 (96) stitches for back for 9.5 (13) inches ending with a wrong side row. On next row, K22 (30) shoulder stitches and place these stitches on a holder, bind off 26 (36) back neck stitches, K22 (30) shoulder stitches on other side and place on holder.
- Right Front: Joining yarn at right front edge, and starting with a right side row, P1, K1, P1, P1, work to end of row for right front. (Notice that the order of stitches for the front band sequence is different than how it was worked prior to the dividing round. This change is required in order to maintain the continuity of the seed stitch pattern on the front band.) Turn work, and now on wrong side row, knit to last four stitches, K1, P1, K1, P1. Repeat these last two rows until 46 (# of rows to get length specified) rows have been worked since dividing row, or until front measures 7 (10)inches from dividing row, ending with a wrong side row.
- Right Front neckline shaping: On next row (right side), bind off 6 (8) stitches and work across. Purl next row. On next row (right side), bind off 4 (5) stitches and work across. Purl next row. On next row (right side), bind off 2 (2) stitches and work across.
- Finish Right Front: Continue working in stockinette until right front measures 9.5 (13) inches from dividing row and is the same length as the back.
- With "public" (right) sides together, join right front to right shoulder of back using three-needle-bind-off.
- Left front: Joining yarn at back of left armhole (where stitches have been saved on holder immediately next to back, right side row next, bind off 14 (18) ribbing stitches, knit to last four stitches, then P1, K1, P1, K1. There will be 34 (47) stitches on the needle, and "dividing row" has just been completed. Next row (wrong side row), K1, P1, K1, K1, purl across. Next row (right side row), knit to last four stitches, P1, K1, P1, K1. Continue repeating these last two rows until 46 (# of rows to get length specified -- should be same as right front) rows from dividing row, ending with right side row.
- Left front neckline shaping: On next row (wrong side), bind off 6 (8) stitches and work across. Knit next row. On next row (wrong side), bind off 4 (5) stitches and work across. Purl next row. On next row (wrong side), bind off 2 (2) stitches and work across.
- Finish Left Front: Continue working in stockinette until left front measure 9.5 (13) inches from dividing row and is the same length as the back.
- With "public" (right) sides together, join left front to left shoulder of back using three-needle-bind-off.
- Using 16 inch size 8 circular needle, pick up and knit 80 stitches along the armhole edge of one sleeve. (Do not pick up any stitches in the area which was bound off for the sleeve inset. In other words, pick up and knit these 80 stitches only on the front and back edges of the armhole, and not in the underarm.)
- Work back and forth in stockinette stitch for 12 rows (which should be about 2 inches).
- Join to work in the round placing marker for end of round.
- Knit 5 rounds.
- Decrease round: K1, K2tog, Knit to last three stitches of round, SSK, K1.
- Continue as established, decreasing every 6th round until 48 stitches remain.
- Knit 5 more rounds.
- On next round, *K4, K2tog*, repeat between ** until end of round. 40 stitches remain.
- Change to smaller needles and work K2, P2 ribbing for 20 rounds.
- Bind off in ribbing.
- Stitch underarm sleeve seam.
- Make second sleeve the same as the first.
- Using size 6 circular needle, and starting at right front edge, pick up and knit 21 stitches along the right band and front, 31 stitches along the back, and 21 stitches alond the left front and band.
- Turn work and *K1, P1*, repeat between ** until one stitch remains, K1. Repeat this row until collar measures 2 inches. (This should be creating a seed stitch collar.)
- Change to size 8 circular needle and continue working in seed stitch for 2 more inches.
- Bind off in pattern.
- Sew underarms closed.
- Weave in ends.
- Block.
- Install zipper.
4 comments:
I love this cardigan, and have just linked it to ravelry, the knitting and crocheting community website.
Where can I send you a picture to? Jessica, cardigan lover!
Oh my god, there's a great deal of useful material in this post!
I was searching for a hat to make for the British winter and found the OXO one I love, then saw your other work; you are one gifted lady. This jacket is both simple (in design) yet attractive; I would really like to try it; thank you so much.
Laura UK
Post a Comment