Tuesday, June 13, 2006

Did you knit in public??

Dear Laura:

I love your sweater!! I'm glad you're happy with it too - that makes a world of difference...And thanks for all the work you're doing posting free patterns!

Yes, Saturday was WWKIP day! (World Wide Knit in Public) I have a hard time seeing the need for a special day, since I've always been one to knit wherever and whenever I find myself. (The only 2 exceptions are church, and business meetings where they have said, "No, you can't knit during the meeting!") Otherwise "in public" is my knitting ground!

I've knitted in resturants, doctor's offices, hotel lobbies, Major League Ballparks, convention floors, on planes, trains, busses, and subways, at family reunions....ok, and once...well, once in the fellowship hall of the church while waiting for a funeral to begin....

So I don't know how much credit I'll get for my WWKIP activity. The only "public" knitting I did was at a graduation party for my cousin's daughter. However, I can report that at my table, everyone commented that I had been knitting the last time they saw me, and some could even remember the project. "You finished that baby hat at my house that day, didn't you?" "Did you finish the scarf you were working on at the reunion??"

I worked on this hat from the book One Skein. It seemed like a quick project to do for Lydia while she waits for her sweater (it did only take about 4 hours.) I also heard from her mother that her head is too little for the hats that she buys, so I'm hoping this (in a "newborn" size) will fit. I'm still waiting on a report. I used Cottonade yard...I'll have to look up the manufacturer. It is hard for me to knit with cotton, but this yarn is so cute! I'm going to make several more hats, and the baby kimono to have for shower gifts. I just have to space out the cotton knitting!

Once I finished the hat, it was back to the lace Baptismal shawl. I'm up to row 40, and I'm really due for a lifeline, but I would really like to finish this portion of the chart. I know, I know, I will probably regret trying to stretch this out..... It was really nice to switch back to that lovely, wispy yarn after the chunkier cotton. My hands gave a sigh of relief!

Which reminds me - I had quite a teaching adventure last Thursday. I had scheduled a student during "Knit-In" who wanted help with a chunky hat, and while we were working, a student came in with questions about a heel of a fingering weight sock. So, to my left I had size 1 needles and decreases and to my right, size 10 needles and increases! (I'm told there was another student with a question that I handled, but I honestly have no recollection of that!)

So, there's the news for now...

Keep knitting!

Cynthia (aka Designated Knitter)

Saturday, June 10, 2006

Finally Finished

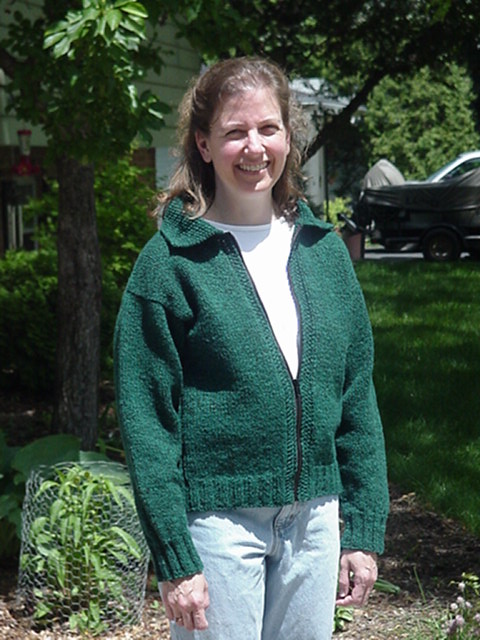
Dear Cynthia,I finally finished the collared zip cardigan, shown here with my most recently completed dish rag. I've posted the pattern for the cardi in the "free patterns" section, including a snapshot of what it actually looks like with a person wearing it.
The other project which is taking me forever to finish is the "big A" sweater (shown here in its current state). I'm going to try to finish it this next week and post the pattern shortly after...

I've also found a new challenge: to determine how many 7-inch-square dish rags may be knit out of one pound of Lion Brand Kitchen Cotton. Any guesses? Anybody? I'll send a dish rag to the person who comes the closest to the right answer!!

(Hint: Here is what one pound looks like after making three of them...)(....and here is what it looks like before any has been used...)
Warm regards,
Laura (YarnThrower)

Collared Zip Cardigan

A pattern by YarnThrower

This is a basic bulky cardigan. It has ribbing under the arms for subtle shaping, modified drop shoulders, and a collar. Feel free to explore your own creative genious by using this pattern as a "blank sheet" to embellish with stitch patterns or color work, or just make it plain, as I did, using a nice yarn. It is perfect for a fall jacket, and the bulky yarn makes it very warm.

It is knit with the front bands, fronts, and back as one piece from the lower edge to the underarms. Then some stitches are cast off for sleeve insets, and the fronts and back are knit separately up to the shoulders, then attached at the shoulders with three needle bind-offs. Sleeves are picked up from the armhole edges and knit down from the shoulders, first back and forth for a couple of inches in the inset area, and then joined to knit in the round down to the cuff. The collar is picked up and knit from the neckline. The only finishing on this sweater is weaving in the ends, sewing a four inch seam in the underarm area of each sleeve, and installing a zipper. Directions for sewing a zipper into a cardigan may be found here.

(This pattern is the property of YarnThrower and may not be reproduced except for one copy for individual use. If you otherwise print or distribute this pattern without YarnThrower's written permission, you are stealing.)

Finished Size: This sweater, as shown, has a 40 inch chest measurement. Since this is a free pattern, and since I don't know what the interest in it will be, I have not worked out the math for other sizes. However, if you are interested in a particular size, send me an e-mail with your wishes, and I'll see what I can do.
Updated 10/29/2006: To include directions for a 54 inch circumference (2x).

Materials:
  • Blackberry Ridge Nubby Wool (bulky weight, approximately 185 yards per 4 oz), 6 hanks. (Not sure how much would be required for the 54 inch (2x) size.)
  • 20" separating zipper to coordinate with yarn (24" zipper for larger size)
Needles:
  • Circular, 16 inches for upper sleeves, size 8
  • Circular, long enough to hold 166 (226) stitches for body (worked back & forth), size 8
  • Circular to hold 150 (204) stitches for lower body ribbing (worked back & forth), size 6
  • Double pointed needles for lower sleeves cuffs, size 6
  • Double pointed needles for lower sleeves above cuffs, size 8
Notions:
  • Darning needle
  • Scissors
  • Tape measure
Gauge:
15.5 stitches and 25 rows to 4 inches in stockinette

Pattern:

Body of sweater:

  • Using size 6 circular needle, cast on 150 (204) stitches.
  • Row 1: K1, P1, K1, P1, *K2, P2*, repeat area between ** until last six stitches, then K2, P1, K1, P1, K1.
  • Row 2: K1, P1, K1, K1, *P2, K2*, repeat area between ** until last six stitches, then P2, K1, K1, P1, K1. (Note that this sets up a seed stitch border along the front edges that spans three stitches on each side, and a one-stitch "channel" next to each border, and 2x2 ribbing along the rest of the lower edge of the cardigan.)
  • Repeat rows 1 and 2 until 16 rows have been completed, increasing 16 (22 -- space 12 of these within the back section, and place the remaining 10 within the front sections (5 within each front)) stitches evenly spaced in row 16 (making sure that these increases aren't made within the 14 (18) stitches under each arm -- the ribbing in this area will continue up to the armhole). Now there will be 166 (226) stitches on the needles.
  • Change to size 8 circular needle.
  • Next row (right side): K1, P1, K1, P1, K30 (43), place marker, P2, K2, P2, K2, P2, K2, P2, (add K2, P2 for larger size) place marker, K70 (96), place marker, P2, K2, P2, K2, P2, K2, P2, (add K2, P2 for larger size) place marker, K30 (43), P1, K1, P1, K1. (The two P2 K2 sections, which are between markers, set up the ribbing under the arms, which is continued all the way to the armholes.) (Note that at this point, there are two fewer "front" stitches than there are back stitches. This is to allow for the space the sewn in zipper will take up.)
  • Next row (wrong side): K1, P1, K1, K1, P30 (43), slip marker, K2, P2, K2, P2, K2, P2, K2, (add K2, P2 for larger size) slip marker, P70 (96), slip marker, K2, P2, K2, P2, K2, P2, K2, (add K2, P2 for larger size) slip marker, P30 (43), K1, K1, P1, K1.
  • Repeat these two rows until work measures 13 inches (14 inches, or desired length to armholes) from cast on edge, ending with a wrong side row.
  • Next row, divide for fronts and back: Work across 34 (47) stitches as established, place these 34 (47) stitches on holder (scrap yarn), bind off 14 (18) ribbing stitches (for bottom of armhole), work across 70 (96) stitches, place remaining 48 (65) stitches in row on another holder.
  • Back: Knit stockinette (knitting on right side rows, purling on wrong side rows) on 70 (96) stitches for back for 9.5 (13) inches ending with a wrong side row. On next row, K22 (30) shoulder stitches and place these stitches on a holder, bind off 26 (36) back neck stitches, K22 (30) shoulder stitches on other side and place on holder.
  • Right Front: Joining yarn at right front edge, and starting with a right side row, P1, K1, P1, P1, work to end of row for right front. (Notice that the order of stitches for the front band sequence is different than how it was worked prior to the dividing round. This change is required in order to maintain the continuity of the seed stitch pattern on the front band.) Turn work, and now on wrong side row, knit to last four stitches, K1, P1, K1, P1. Repeat these last two rows until 46 (# of rows to get length specified) rows have been worked since dividing row, or until front measures 7 (10)inches from dividing row, ending with a wrong side row.
  • Right Front neckline shaping: On next row (right side), bind off 6 (8) stitches and work across. Purl next row. On next row (right side), bind off 4 (5) stitches and work across. Purl next row. On next row (right side), bind off 2 (2) stitches and work across.
  • Finish Right Front: Continue working in stockinette until right front measures 9.5 (13) inches from dividing row and is the same length as the back.
  • With "public" (right) sides together, join right front to right shoulder of back using three-needle-bind-off.
  • Left front: Joining yarn at back of left armhole (where stitches have been saved on holder immediately next to back, right side row next, bind off 14 (18) ribbing stitches, knit to last four stitches, then P1, K1, P1, K1. There will be 34 (47) stitches on the needle, and "dividing row" has just been completed. Next row (wrong side row), K1, P1, K1, K1, purl across. Next row (right side row), knit to last four stitches, P1, K1, P1, K1. Continue repeating these last two rows until 46 (# of rows to get length specified -- should be same as right front) rows from dividing row, ending with right side row.
  • Left front neckline shaping: On next row (wrong side), bind off 6 (8) stitches and work across. Knit next row. On next row (wrong side), bind off 4 (5) stitches and work across. Purl next row. On next row (wrong side), bind off 2 (2) stitches and work across.
  • Finish Left Front: Continue working in stockinette until left front measure 9.5 (13) inches from dividing row and is the same length as the back.
  • With "public" (right) sides together, join left front to left shoulder of back using three-needle-bind-off.
Sleeves:
  • Using 16 inch size 8 circular needle, pick up and knit 80 stitches along the armhole edge of one sleeve. (Do not pick up any stitches in the area which was bound off for the sleeve inset. In other words, pick up and knit these 80 stitches only on the front and back edges of the armhole, and not in the underarm.)
  • Work back and forth in stockinette stitch for 12 rows (which should be about 2 inches).
  • Join to work in the round placing marker for end of round.
  • Knit 5 rounds.
  • Decrease round: K1, K2tog, Knit to last three stitches of round, SSK, K1.
  • Continue as established, decreasing every 6th round until 48 stitches remain.
  • Knit 5 more rounds.
  • On next round, *K4, K2tog*, repeat between ** until end of round. 40 stitches remain.
  • Change to smaller needles and work K2, P2 ribbing for 20 rounds.
  • Bind off in ribbing.
  • Stitch underarm sleeve seam.
  • Make second sleeve the same as the first.
Collar:
  • Using size 6 circular needle, and starting at right front edge, pick up and knit 21 stitches along the right band and front, 31 stitches along the back, and 21 stitches alond the left front and band.
  • Turn work and *K1, P1*, repeat between ** until one stitch remains, K1. Repeat this row until collar measures 2 inches. (This should be creating a seed stitch collar.)
  • Change to size 8 circular needle and continue working in seed stitch for 2 more inches.
  • Bind off in pattern.
Finishing:
  • Sew underarms closed.
  • Weave in ends.
  • Block.
  • Install zipper.

Thursday, June 08, 2006

Calling All Reinforcements

Dear Cynthia,
First, I just want to mention how much I have appreciated the comments which people have left on our blog! In response to the question about the skirts, I was using an existing booklet called "Sassy Skirts", by Cindy Taylor Oates. I followed the basic instructions for skirt construction, and used the pattern for the top tier, but the remaining tiers are just long rectangular strips which I sized based on how much fabric I had in my stash. My goal was "no new fabric". It sounds a lot like my knitting mantra for the summer: "no new yarn". And to "anonymous", I just want to say, "Thank you for your kind comment!"

Regarding the more angst-causing thing in my life right now: Summer in Kansas, I actually made positive progress (which I have not had to frog yet a fourth time...so far) in the knit-on-border arena. I credit invoking all forms of "reinforcements". Notice the following in this photo:
  • Stitch markers on the needle between every ten stitches so that I can more easily make sure that I'm using up the "live stitches" at the rate the pattern calls for
  • An Excel chart having 36 rows and 10 columns, for me to put an "x" in each box after knitting one row. The most insane part of this is that once I fill up this chart, I am only just approaching the center point, and after the center point, I get to fill up this entire 360 square chart AGAIN
  • It might be difficult to spot, but I put lifelines in a few border rows, just to insure that I never in this lifetime have to go back and re-start the #%&)*ing border again.
  • I switched from my circular needle to a straight needle, which is just easier for me to maneuver
My original goal was to have this done by June 25th. Since the border has 890 rows in it, I must knit 50 rows per day, which is very workable as long as I stop doing laundry and keep the de-cluttering in the house to a minimum. We'll see.....

I'm glad to see you are starting your lace so that we may comiserate, I mean share in each other's victories. Your post made me feel less like a moron.... Or, perhaps it just means we are both morons? I've been called worse....

Warm regards,
Laura (YarnThrower)
P.S. I've got to try that Russian join you mentioned. It looks quicker and easier than unraveling plies and using spit to try to attach ends together.

Wednesday, June 07, 2006

Lace Begun......

Dear Laura:
Hey, your dishcloths look great! I agree that I don't like them to be too large. I like the pattern from the ball band - I may have to dig out some of my kitchen cotton and give it a try.
Well, there has been knitting progress here. I believe that I have finally got the baby sweater worked out. I was about to say it is for sure because I'm about 1/2 done...but then I remembered that I ripped out 3/4 of the body a mere week and a half ago, so I decided to be "optimistic" rather than "sure."
I cast on at the top and worked to the divide of sleeves and body. I finished that ball of yarn on the body, switching to twisted garter stitch (which I am now a big fan of!) I ripped out the swatch and used it to make the collar. I ran out of yarn about 7 rows from the end, so I attached a new ball using the Russian Join (another thing I've become a big fan of!)
I'm almost done with the first sleeve, and hoping I can get both sleeves from this ball of yarn. Then I'll use all remaining yarn on the body, doing twisted garter until the yarn runs out. Hope it comes to the waist...
I would also note my conviction that I have enough yarn for a "baby sweater". I do believe that with all my heart. However, I should mention that yesterday I discovered I had not been paying attention, and I'm making the 12 mos size instead of the 6 mos size. So, if this ends up being a bit...um...short..it will be because I'm making a sweater that is really larger than a "baby sweater." Just sayin'.
At this point I decided that I'm far enough along on the sweater that I can start the baptismal blanket.
So, lace begun. I sat down Monday evening with my yarn, needles, pattern, a bright light, and laptop pointed to Eunny's lace primer. I first tried the 'circular provisional-type' cast on. That really didn't work for me.
Next I tried (successfully) the 'circular crochet-type' cast on, and began the blanket. (Here's a picture.) But I made it to row 5!
Finally, a picture of my current attempt. (Once again, note the lack of temptation to the knitting gods.* I did NOT say the 'final' cast-on.) I finished row 16 last night, and I think I will put in a life line before I go any further. I've had a couple of near misses..... ***(NOTE: Since it took me 2 days to post this to blogger, I need to add that when I went to add the lifeline, I discovered that it was too late, and I was already 4 stitches "short" on the round. I tinked a couple of rows, but it did not improve....so, after starting over from scratch, I'm back on row 12!!)
That's the news from here!
Keep knitting!
Cynthia (aka Designated Knitter)
*FTR, I do not believe in the knitting gods!

Tuesday, June 06, 2006

Hanging by a Thread

Dear Cynthia,

Today, my tale is one of woe and disappointment. (Knitting, apparently, isn't **always** about the therapeutic value.) Last night, I ripped out the knitted-on-lower-edging of my Summer in Kansas Shawl for the third time... I had been happily approaching row 38 on my nice little edging pattern when I counted the stitches on my needle holding the main body of the shawl in all of its 405 stitch glory. (Why did I do this? Am I anal? Was I looking for trouble?) It was then I discovered that someplace in the midst of the 405 live stitches, I had misplaced one of them..... I considered moving on anyway, except given the other two prior froggings, I decided that I'd better go back and make sure I had not inadvertently dropped any live stitches.... And so, I took it back to the lifeline, a point at which I'm fully, or maybe just somewhat, confident that I was at a place in which everything was on track, and I felt really good about this project, and I was sleeping well at night.

In all of this, I had a chance to examine the shawl "off the needles" (being kept in tact only by that mere skinny thread of a lifeline), and I confess I felt a hint of disappointment by its small and crumpled appearance. (Shown here on our kitchen table, which is only three feet wide, I'm a little nervous that it will not offer the arm coverage I was hoping for on cool summer nights.) I'm keeping the faith right now that blocking will transform this mutant product of knitting into something looking more like this...but really, right now it truly is only faith - that which I believe without seeing...

If there is anybody who might offer reassurance regarding the whole shawl-blocking thing, I would love to hear that my doomful thinking is errant and that this will have a happy ending.

Warm regards,
Laura (YarnThrower)

Not exactly extraordinary...but functional !

Dear Cynthia,

The first week after my class was done, I knit like a fiend. This week, I decided that it's time to make the house a functional entity again. (I once had dreams that my home would be "house beautiful", but the reality of four people coming and going, and all the paperwork which goes along with that, has made me realize that "house functional" might be more of an achieveable goal for me...especially having a knitting addiction, too.)

And so, though knitting progress continues, sort of being just one of those things I do every day, like brushing my teeth, and cleaning up the kitchen, and breathing, there is nothing extraordinary about what I'm sharing today, except for the fact that having this hobby continues to keep me sane and is part of the reason I don't see a therapist (so far, anyway).

Two dish rags! Combined with a couple other items I'll pick up at the grocery store today, here is a housewarming gift for some friends from Fort Wayne who will be moving here in the next week or two. This is the "standard" Grandma's Fav pattern, and I took the optional suggestion and did a row of single crochet around the edges, which I like.

Then I switched to the pattern which was printed on the inside of the Kitchen Cotton label, except casting on 34 instead of 46 stitches. (I like my dishrags to be about 7 inches square - any bigger than that, and I find them cumbersome.) I like the way the pattern looks, and it is a simple four-row repeat. Thank you for overlooking the whole "Kitchen Cotton thing"! As a small consolation, I thought you should know that I feel a bit conflicted knitting it using Addi TURBOs...

A final note: The sweater underneath this dishrag in the photo is done except for installing the zipper, and the pattern is halfway written. I'm going to try to get that all finished this week, and I'm thinking of putting a tutorial together for how to install zippers. It continues to be my favorite method for closure on a cardigan. More on these developments as they happen.

Warm regards,
Laura (YarnThrower)

Sunday, June 04, 2006

Busy weekend

Dear Cynthia,

We've had a busy but fun weekend. My dad took the boys fishing in a boat yesterday, and I went along. For the first time ever in my fishing career (which admittedly isn't very extensive), I had an opportunity to use the "big net". It was very exciting. You see, all through my childhood, whenever my dad took me fishing, the "big net" always went with us, though I never had an opportunity to use it. But, yesterday was different, because my three year old accidently dropped his little toy tackle box into the lake... Now I totally understand the need for bringing the "big net"...

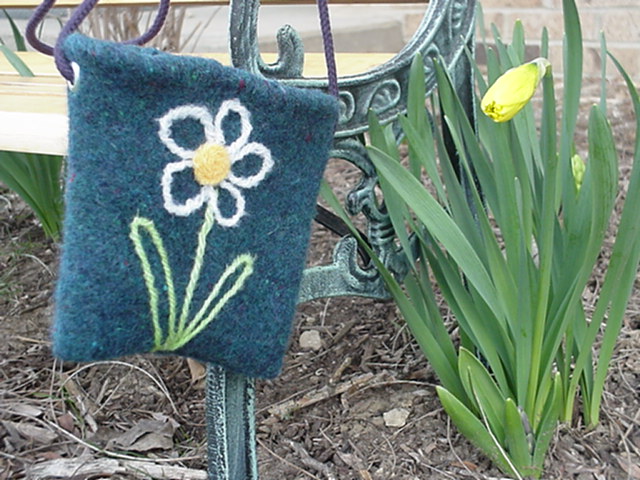
Anyway, I posted another pattern for our blog's sidebar -- sort of an "extension" to the Satchel Bag pattern which is already there..... It is just a little something to do with the felted sleeves once the Satchel Bag is made... It goes together very quickly, and is fun to "wear".

Warm regards,
Laura (YarnThrower)

Oopsy Daisy Envelope Bag (Felted)

A pattern by YarnThrower Made from a felted sleeve (discarded while making the Oopsy Daisy Satchel Bag), the Envelope Bag has become my favorite summertime purse. With my cell phone and a few other essentials tucked inside and hanging securely around my neck, I am ready to go to the park with both hands free for helping young athletes make their way across the "monkey bars". Cording is threaded through eyelets on the sides of the bag, and there is a sewn in snap closure at the top.

(This pattern is the property of YarnThrower and may not be reproduced except for one copy for individual use. If you otherwise print or distribute this pattern without YarnThrower's written permission, you are stealing.)

Finished Measurements:
Bags shown measure 6 x 5 inches and 7 x 7 inches

Materials:
  • A felted sleeve from a sweater gone bad (see directions for Oopsy Daisy Satchel Bag)
  • Sewing shears
  • A few yards yarn for hemming edges, to match or contrast with sweater
  • Sharp tapestry needle
  • Felting needle
  • Foam
  • Assorted scrap bits of yarn of any material (novelty okay)
  • Chalk pencil (optional)
  • Serger or sewing machine (optional)
  • Two 0.25 inch eyelets
  • One 0.75 inch sew-on snap
  • 2 yards of cording, either purchased OR made by felting knitted I-cord

Pattern:
  • Use one of the sleeves from the sweater. The bag may be made from a part closer to the top of the sleeve (for the larger bag) or from a part closer to the cuff of the sleeve (for the smaller bag). Leaving a 0.5 inch hem allowance for the bag top, make a cut straight across the sleeve for the bag top. Leaving a 0.5 inch seam allowance for the bottom seam, make a cut straight across the sleeve for the bag bottom.
  • Fold top edge of bag 0.5 inches to the inside, and overcast stitch it in place using a sharp tapestry needle and matching or contrasting yarn.
  • Needle felt per directions included in Oopsy Daisy Satchel Bag pattern. If foam is too large to fit inside the bag, just place the whole bag on top of the foam, needle-felt the design onto the front of the bag, and then carefully open the bag to separate the bag front from the bag back (which may have gotten a little bit "caught" in the needle felting, but which should easily pull apart).
  • Turn inside-out (so right sides are together). Stitch lower edges together using a serger, a sewing machine, or by hand. Turn right-side-out.
  • Attach sew-on snap to top centers of bag on inside.

  • Following package directions for eyelets, attach one to each side of bag, just below hemmed edge.
  • Thread cording into eyelets, one end on each side of bag, going from outside toward inside of bag. Adjust length and tie each end into a knot to hold it securely just inside the eyelet. Trim off excess.

Thursday, June 01, 2006

Shawl Math: 160 rows = 100%

Dear Cynthia,

First, here is a snapshot of one of the finished skirts, after a trip through the washer and dryer. Thank you so much for humoring me regarding this diversion into a non-knitting universe. Can you spot the five-year-old in the photo?

The really big news is that I completed all of the 160 rows for the main body of my Summer in Kansas Shawl! Then the directions said to "break yarn, leaving an end for weaving in later"....and so I did! Feeling victorious, and invincible, I started the "knit-on-border".

In this "knit-on-border", there are stitch sequences such as K1, (YO, P2tog)twice, YO, K1b..... I **thought** I knew how to do the yarn overs for all of these cases (between a knit and a purl stitch, between two purl stitches, and between a purl & a knit stitch.

Not **exactly**. I'm no longer feeling invincible.

However, after concentrating on page 63 in my Vogue Knitting book, and with the help of some scrap yarn, I think I figured it out...

One other thing..... I thought 160 rows and 405 live stitches on the main part of this project was ominous. Now, for the border, I'm facing more than 720 rows of 17-21 stitches each. As I mentioned before, if it doesn't kill me, it will make me stronger! .....Right?? Isn't math great?

Warm regards,
Laura (YarnThrower)

Baby Sweater....

Dear Laura:

Every so often I run into a project that thwarts me at every turn. I simply had no idea that this was going to be one of them!

I have been so excited about this yarn - I got it at the Fiber Festival in Allegan MI last year. I loved this yarn, but being on a VERY tight budget, I circled it the entire day. "I really love that yarn, but it's $28..." "Great colors and it would make a beautiful baby sweater.." "It's so soft and yummy..." I'd fondle it for a while and then move on, always coming back. Finally, I took a deep breath and bought it.

And waited for a girl-child. I dangled it in front of all my pregnant friends/family...."Look, the next girl gets this! Think girl thoughts!!" And my niece Amanda won the yarn lottery when presented us with Lydia Marie on May 3.

As you may recall from my blog entry that day, I sat down and swatched the yarn, paged through pattern books, and chose a pattern. I cast on for the back of the sweater, and knitted a couple of inches.

Then I had second thoughts. While my swatch gave me the correct gauge, the fabric seem too tight and stiff. Besides, it had occurred to me that the varigation would look different on the narrower fronts.

I talked to you about it on the way home from my vacation, and decided to start again. I did another gauge swatch on larger needles, and then cast on to do the body in one piece, using steeks for the sleeves and adding a zipper instead of buttons. Ok, while I was still using a 4x1 garter rib, I could no longer say I was really following a pattern. Which is always fine with me.

I fussed around with the math, finally decided how many to cast on....and started knitting. I would like to mention parenthetically that I cast on the same number of stitches as I had on the needles for the red baby blanket!

I knit away for a couple of inches......and on May 22nd, I posted the question: If the garter stitch bottom rolls now, will it always roll or will it block out? This bothered me, and since I got no feedback to reassure me.........

Another frogging session.

I went in search of a whole new pattern. And ended up with this pattern from Knitty. It's a cute sweater, and being knit sideways, I thought it would showcase this yarn in an interesting way! Plus, it offered the ever appealing option of doubling the yarn and knitting with a bigger needle and less stitches. (Yes, it did haunt me that the sweater was using as many stitches per row as the baby blanket that took so long!)

So! I did another gauge swatch!! I cast on Friday evening with a long weekend ahead of me. Boy, did this fly on bigger needles!! The fabric was heavy and a bit stiff, but that makes it a great jacket for fall. I did narrow the center sections a bit, so that it wouldn't leave so much open on the shoulders.

By Sunday morning, I was over 3/4 of the way done, and the niggling at the back of my head had become a full grown TRUTH. There was no way I had enough yarn to knit this sweater with the yarn doubled. I had noticed that it required more yarn than the finer gauge, but I assured myself that I had "quite a bit" of yarn. (Lost the ball band, so I don't know exactly how much.....)

Sunday afternoon was spent at a barbeque, where one of my nieces helped with the frogging and rewinding.


Still determined that this yarn is a baby sweater.....I have cast on a pattern from the Summer 2006 "Easy Knitting." This incarnation of the yarn is a top-down raglan style. The pattern calls for knitting down to the sleeves, then knitting the body, coming back to the sleeves and finishing with a collar.


Since I have had quantity issues with this yarn, but I firmly believe that it is enough for a baby sweater, I am going to knit to the sleeves, then do the collar, both sleeves, and then the body...until I run out of yarn! The sweater in the picture is pretty long, so if it is more like waist-length, that will be fine with me.

Here's hoping it isn't a shrug. Hmm, maybe I'll rip the first swatch and use it for the collar....

And I know that I have a reputation for being...well...a yarn snob, and I wear the label with pride, but hey, if you're gonna knit dishcloths...what else would you use but kitchen cotton?? I have at least a pound of it, just not on one big cone!!

The skirts look great!

Keep knitting!

Cynthia (aka Designated Knitter)

Wednesday, May 31, 2006

Sidetracked

Dear Cynthia,
I interupt this knitting blog to bring you the reason I have been knitting less the past few days. (Well, actually, the **real** reason I have been knitting less is because I have two sweaters which I just finished knitting and I am stalling to do the finishing on them. We all know how much I **enjoy** finishing sweaters.)

The **pseudo** reason is that I'm on a skirt-making kick, for a birthday and also for somebody needing comfy/cool clothes for a European vacation (which is not me, by the way -- no European vacations scheduled here -- just a trip to Door County later this summer). These look much better once they have been washed and then dried all bunched up (tied to keep them scrunched together), sort of like the old broomstick style skirts having vertical pleats/crinkles.

Also, I bought some "Kitchen Cotton" Lion Brand, a whole pound of it. [My knitting friend, whom I'll call "Catherine", bought a pound of white Peaches and Cream a few weeks ago, and I laughed. Catherine, are you laughing now?] I feel like I'm letting you down, Cynthia, because I know that yarn which may be found at Michael's is not your **favorite** brand of yarn, nor is it my favorite. For nice sweaters, I usually get the best I think I can afford, and it is generally worth the extra money for the quality and feel of the finished product. However, with this cotton, I figured that cheapo would be okay since it is for simple workhorse dishcloths, and by simple, I mean it will probably be the standard square ones where you start at one corner and end at the diagonally opposite corner (known as "Grandma's Fav" on this page). A colleague of dh's from Indiana is moving here in the next few weeks, and my current "stash" of dishcloths for misc small gifts (including house-warming) is depleted, so time to make some more.

Well, there is much to do if I'm going to have more knitting content in the next few days. It would be nice if I could share a sweater which is actually finished! Hopefully in the next couple of days, with free patterns for both at some point, too.

Warm regards,
Laura (YarnThrower)

Saturday, May 27, 2006

Response from Knitty

Dear Cynthia,

At the beginning of April, you might remember that I had been working on a special "secret project", which I could not reveal on the blog.

In any case, it was a pattern submission to Knitty, for a project I designed using one of the sweaters I knit which had been languishing in the "rework" pile. I did not hear back from Knitty for a long time, which, according to their web site, means it might have possibly been in the queue for consideration..........until today, that is. Here is an excerpt from the response I received:

"Thanks so much for your submission! We were inundated with designs this issue and had to make some touch choices, so unfortunately we won't be able to use yours. It didn't help that someone just published something quite similar in concept at the whipup blog. But at least that means you're on the right track! :-) "

I checked out the whipup blog, and there is, indeed, an idea of the same genre which was submitted just three days ago, long after mine got into the Knitty inbox, but soon enough to be referenced by Knitty's publisher in my rejection notice. And so that's how it goes sometimes.

I just posted the Satchel Oopsy Daisy Bag Pattern to our blog, however, so check out the "free patterns" section on the sidebar... Also, in the next day or two, I'll try to post directions for the other two bags shown, as well.

Warm regards,
Laura (YarnThrower)

Oopsy Daisy Satchel Bag (Felted)

A pattern by YarnThrower

The creative process is not without risks. Occasionally a finished project falls short of an idealized vision for how it is supposed to look. A few years ago, I made a sweater that couldn't have been less flattering on me. I thought that slightly shrinking it would make it look better, but all it did was to make it impossible for me to unravel and reclaim the yarn. And so, I decided to try an experiment to turn it into something completely different. I felted the sweater until it would shrink no more, made some strategic cuts, sewed a couple of hems, added some notions from my local fabric store, and tried my hand at needle felting. And so was born these Oopsy Daisy bags. Try these techniques with your own sweater which might be too big, or which might have been accidentally shrunk in the wash, or use an old wool sweater from a second-hand store.

(This pattern is the property of YarnThrower and may not be reproduced except for one copy for individual use. If you print or distribute this pattern without YarnThrower's written permission, you are stealing.)

FINISHED MEASUREMENTS:
Varies, depending on the size of sweater and the amount of felting. The Oopsy Daisy Satchel Bag shown measures 17 x 12 x 4 inches (without handles).

MATERIALS:
  • Any sweater which has been made using fiber which can be felted
  • 2 to 3 yards of feltable yarn which matches sweater, to sew bottom closed
  • Pillow case, preferably one with a zipper closure
  • Sewing shears
  • Sharp tapestry needle
  • A few yards yarn for hemming edges, matching or contrasting nicely with sweater
  • Sharp hand-sewing needle
  • Thread to match sweater
  • Felting needle
  • Foam (to use underneath "fabric" when needle felting)
  • Assorted scrap bits of yarn, of any material including novelty, whatever you have
  • Chalk pencil (optional)
  • Serger or sewing machine (optional)
  • Set of two oval purse handles, 5 x 8 inches
GAUGE:
Whatever gauge your finished sweater has will be fine. Mine was made of worsted weight yarn, having a gauge of 4.5 stitches per inch before felting.

PATTERN:
  • With wrong sides together, and using a loose overcast stitch which catches only the very edges of the fabric, attach front to back of sweater at lower edges using matching feltable yarn and a sharp tapestry needle, completely closing off the bottom.
  • Place sweater into pillow case, zip or tie it closed, and place it in washing machine. Start washing machine with it set for longest cycle, hot water, and maximum agitation. Just before washing machine goes into spin cycle, check the sweater to see how much it has felted. If desired, reset the washing machine to the beginning of the agitation cycle and start it again. When sweater has felted the desired amount, allow washing machine to complete its cycle. Remove sweater from pillowcase and lay flat to dry.
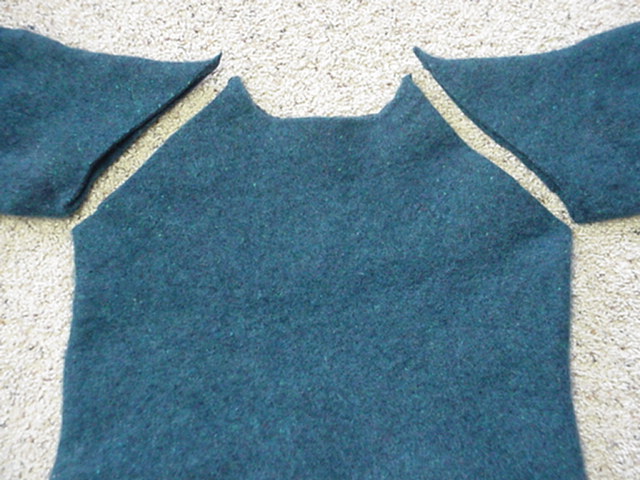
  • After sweater is completely dry, make two cuts using sewing shears. Each cut will go from the underarm and diagonally up to the side edge of the neckline, as though following along an imaginary raglan sleeve line. Also cut the back neckline to follow the same curve as the front neckline does.

  • Using the body of the sweater, fold the edges (from where the sleeves were cut) 0.5 inches to the inside. Overcast stitch them in place using sharp tapestry needle and matching or contrasting yarn.

  • Using a serger, or a sewing machine zig-zag stitch, or an overcast stitch by hand, edge-finish the neckline cut edges of the sweater. This will give the fabric edge more stability (especially the back edge, where the cut was made to make it match the front) and help prevent the fabric from tearing.
  • Folding front neckline edge over one side of an oval purse handle, and using sharp hand-sewing needle and matching thread, sew neckline edge to inside of bag, allowing enough of a casing for the purse handle to move slightly, but not too much. Repeat with the other purse handle along the back neckline edge.
  • Turn bag inside-out. On one lower corner, bring long center line of bag bottom to meet long center line of side, forming a point at the corner. Mark a line 2 inches from the corner point, and stitch across this line, forming the base of an isosceles triangle in which the bag's corner point is at the top. This gives the bag some width. (Then, and optionally, fold the corner point to bottom inside of bag and stitch in place using matching thread and sharp sewing needle.) Repeat on other lower corner.
  • Turn bag right-side-out. Insert foam into bag, behind area which will be needle-felted. (Optional: On right side of bag, use chalk pencil to draw an outline for the picture which will be needle-felted.) Place scrap of yarn onto bag surface. Using felting-needle in one hand, and holding scrap yarn or a knitting needle to guide the scrap yarn with the other hand, poke scrap yarn straight down, through yarn and bag, in a couple of places to tack it down. Continue tacking various scrap yarn pieces to form desired design. Then, securely fasten all of the scrap yarn by really poking away at it until all of the yarn is firmly attached to the bag and the desired look has been achieved.
  • Feel free to finish off the Satchel Bag by adding a pocket inside made from part of one of the sleeves, or from a nice fabric. This bag would also be quite easy to line with a fun print fabric.

Friday, May 26, 2006

Back on Sleeve Island

Dear Cynthia,

I wonder what a psychiatrist would think if you told him/her that you have issues with socks. I know that many knitters do, myself included.... I just wonder if it has ever been explored in therapy, and if it ever catches mental health professionals off guard... It is still so much cheaper, healthier, therapeutic, etc., than smoking, so as far as addictions go, great choice!

I'm having a little problem with the neckline bind-off on the sweater for my nephew's birthday (the first time it was way too loose, then way too tight, still not quite "just right", but I think I'll have it if I bind it off with a size 15 needle in my right hand), but other than that, things are progressing and I'm making sleeves. Target completion date is early July, so no panic.

I keep telling myself that after these sleeves are done, I am going to have a little disciplined session of sewing up this sweater, and doing the finishing on my green sweater. I will make myself do this, because I will feel so much better once done. Knitting "finishing" really is a lot like exercise that way...

Anyway, I'm off to fix that neckline bind-off! Have a great day!
Warm regards,
Laura (YarnThrower)

Thursday, May 25, 2006

Ahem....

Dear Laura:

A couple of posts ago, I blithely tossed off a remark about how I'd cast on a pair of socks. No big deal...having some issues with the baby sweater, thought I'd get a little "distance" while still being productive.

And you are so sweet...you didn't call me on it.

Because it isn't like I needed to cast on new socks - there are plenty of socks-in-progress I could have picked up...some of them from when I posted my sock-yarn stash pictures.


Clockwise from the lower left we have:

The two-at-a-time-on-circular-needles-toe-up socks that I started I've been "working on" for ages.

The second one is my second start for my sockapaloooza socks, which I abandoned because they were coming out too small. These will be frogged.

Next is a sock that...well...I'd forgotten about. I don't know when or why I started it. But there it is. I found it.

Then we have the FIRST sock I started for my sockapaloooza socks. They are a heavier weight, 3x2 garter rib. I got a couple of inches done and decided that I wanted better socks for my sock pal - not just my "in-a-hurry" standby pattern.

And finally..my first jaywalker. I'm at the heel....and just a few rows ago figured out a part of the instructions so the last few rows look right. I decided that I would just keep going forward and not let it bother me that the first cuff was mostly wrong. Yeah, like I can do that. These will also be frogged, I expect.

Especially since I robbed the needles out of them to start THIS sock!! I'm using the yarn that my sock pal sent me, and I really like them!! It's a pattern from "Vintage Socks" by Nancy Bush, which I tweeked just a little.

So, still avoiding the baby sweater. After TWO gage swatches, and TWO cast-ons, I'm still conflicted about it. Maybe if I let it marinate another weekend.....

Keep knitting!!
Cynthia (aka Designated Knitter)

Wednesday, May 24, 2006

"A" is for Intarsia

Dear Cynthia,

Though I like the look of intarsia work......I had forgotten the part about all of the "butterflies" hanging from the back. This is working out just fine, but I don't think I'd want many more than the five strands I'm working with. I used the technique from the Spring 2006 Interweave for estimating the amount of yarn to put into each "butterfly" -- determine the number of stitches which are going to be made with the strand, and then wrap the yarn around the needle that many times loosely. (Of course, I'm a doubter, so I added significant extra "just in case"...)

Anyway, The Blue Blog's idea for printing out knitters' graph paper and then printing a letter onto the same sheet of paper worked like a charm. I did a quick search on "knitters graph paper", input my exact gauge, and presto, it printed out a page, almost exactly to scale 1:1 (though I have to say, a little bit scant, but for this it really doesn't matter much). Then, I found a font in Word which I liked, printed off a letter of size huge (something like 650, or maybe 400??). If I was to do it again, the only thing I'd do differently is to print the letter in a much lighter shade than black, so that I could see the graph paper lines behind it...

Well, it's rainy here today, and my three-year-old got up in the middle of the night to go potty and was dry this morning, so we're going to celebrate by making chocolate chip scones.

Warm regards,
Laura (YarnThrower)

Tuesday, May 23, 2006

Fort Wayne Fiber Festival

Yes, last weekend was the Fort Wayne Fiber Festival! Ok, admittedly not quite up to Maryland Sheep & Wool or Rhinebeck, but we do our part.

This was the third year of the festival....last year I was out of town, but I heard that it was almost washed away in a rainstorm. Not so this year, both Saturday and Sunday were beautiful days. I of course forgot to take my camera (bad blogger!) so I don't have pictures of the event itself. (Not that this should be taken as a hint that I have pictures of any purchases. Me?? Buy yarn?? Hush your mouth!)

It was lots of fun - I got to see some of the gang from the Wooly Knob. (Mostly why I went!) Jamie's dad had some of the yarn from their spinning operation, so I was glad that is going well. I saw both Julie and Kathy from my days of "skirting" fleeces, and got the info on the next big spinning event. Julie's daughter had made some beaded stitch markers for sale, and I had just noticed that all of mine were "in project" and so I did buy a couple of those.

Ok, ok, yes, I also bought some yarn. Man, you people will just nag a girl to death for pictures of yarn aquisitions! ;)


The tan and cream is a cormo-blend from a local handspinner. It is luscious to hold - they had a childs hat knit out of this and it was so yummy-feeling. I thought I'd make a couple of those hats for a charity project, so I picked up a skein. The More-Cynthia-Colored yarn is a sock yarn (duh!) that is enough merino for a pair of socks. Because we've seen the sock stash, and it is in desperate need of additional yarn....

I also have to confess that my pre-knitting addiction has reared its head. I've always kept reading (I can count on both hands the number of times I've fallen asleep at night without a book in my hands....and there may have been...ahem...alcohol involved....) but since I've been knitting I find that most of my reading happens during the last 10-20 minutes of consciousness each day. However, I just picked up a new book by Laurie King in her Mary Russell series. Looks like it was published last year and I missed that. I love these books - starting with The Beekeepers Apprentice - and when I start one, I cannot put it down until it is done. I've spent more daylight hours reading in the last few days than in the last year put together...

So...way to go with the sweater!! And the lace.....that shawl is beautiful! Good luck with the Amazing Lace!

Keep knitting!

Cynthia (aka Designated Knitter)

LOVE / HATE (Amazing Lace Challenge #1)

My name is Laura (aka YarnThrower).

I brought Summer in Kansas home more than a year ago. What's not to love? Its delicate border, its special shaping at the neckline to help keep it in place atop shoulders, its nice size... I could go on and on...

I'm smiling in the photo, but don't get the wrong idea. Things haven't always looked so good between us.

Our relationship really began at the end of March 2006, with turbulent times right from the start. Here is what resulted from our first rendevous... and our second... and our third... and our fourth... I know you get the picture. It was hard to love the lace at that point, and I began to wonder if this relationship was going to be worth all of the work.

However, we persevered. At least three times we had to enlist assistance from a third party (the "lifeline"). Without lifelines I'm not sure where the shawl and I would be, but I'm confident there is a dress code there and nice jackets having sleeves which tie in the back.

In any case, we got through it, and this week we are about to embark on a new phase of our relationship: The knitted-on border. If it doesn't kill us, it will make us stronger!

(I'm also struggling with monogamy, but more on that at another time.)

Monday, May 22, 2006

Blanket Blocking...

Dear Laura:
Yay! The blanket is blocking! I cast off when I got home Friday evening, and now
it is washed and pinned and looking lovely. It ended up being roughly 34" square - love the whole blocking thing. I was worried that it would be barely 30" square, but it laid out beautifully.

So, now it's onward with the baby sweater. I decided not to start the baptismal shawl until I have a bit more of the sweater done. Of course, you know what that means....PROBLEM!!

I've got about 2-2 1/2" of the sweater done, and I'm troubled by the the garter stitch section along the bottom. It insists upon rolling up! I have two chants running through my head.


Chant #1 - Blocking will fix that roll.

Chant #2 - If you think it's hinky when you're knitting it....it will be hinky when you finish it..

So, what do you think? Will blocking fix that roll?? Because if it always tends to roll up, it will make me seriously cranky...

(And because I was plagued by indecision about this over the weekend, I did what any sane knitter would do....I cast on a pair of socks!!)

Keep knitting!!
Cynthia (aka Designated Knitter)