
My favorite sweater closure is the zipper. I think zippers look tidy and "finished", and they are much easier for my kids to "operate" than buttons are. Here are a few notes about how I am going about the installation of the zipper into the Hardangervidda sweater... These are just things I've picked up from experience sewing zippers into several sweaters over the years, and if anybody has additional comments and tips, I'm all ears.
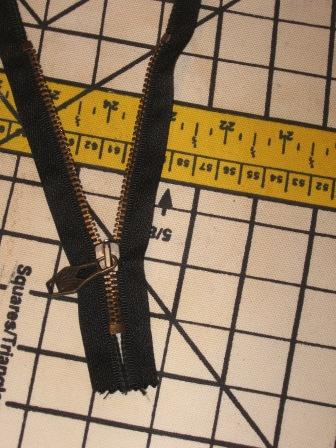
Here is the Dale of Norway zipper which I purchased for the sweater.
 A couple of comments about zippers, because they aren't all created equal.
 - For this particular installation, because it is a zipper in a placket (and **not** a zipper in a cardigan), I do **not** want a "separating" zipper. The zipper I am using for this sweater has a "stop" on the bottom of it, which does just that -- stops the zipper from going down any farther -- and, it does not separate. (Note that a zipper "stop" may be added to a zipper by sewing some overcast stitches at the location where the "stop" is desired, then cutting off the remainder of the zipper about an inch away from this newly created "stop".)
- The other thing I must be careful about for this installation is the zipper length. The opening of my sweater is roughly 5 and a half inches. The length of the zipper between the upper and lower "stops" is about 5 inches. These two numbers do not have to match exactly. If the zipper is shorter than the opening, I wouldn't recommend going any shorter than about a half inch. If the zipper is just a little longer than the opening, it is okay to let the extra length just be on the inside of the sweater, though I'd sew it down. If the zipper is significantly (more than an inch and a half) longer than the opening, it can be made smaller without too much trouble. (Just use some overcast stitches to create a new "stop", and cut off the remainder of the zipper about an inch away from this newly created "stop".) Note that the zipper measurement does **not** include the "zipper tape" which continues beyond the upper stops and the lower stop.
 At this point, take a good look at the area, and note if there are going to be any issues with symmetry. My sweater, for whatever reason, ended up with the right front collar being a little bit higher than the left front collar. Once the zipper is sewn in, I want the major "lines" to line up. Critial to me is the white area at the base of the neckband. When the zipper is closed, the right side should line up with the left side. In this next photo, the left side (which my scissors points to) is higher than the right side, so I must adjust for this when I'm sewing in the zipper, stretching the neckband on the left side slightly to bring it down, and crowding the neckband on the right side slightly to bring it up a little bit.
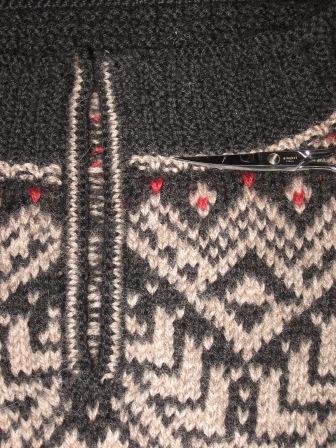 Fortunately, there is a product on the market called "Wonder Tape". The information on the package states that it "completely disappears in first washing", that it is "a double-sided transparent tape that can be stitched through -- it will not gum up your needle". So, I lined up this tape along the outer edges of my zipper, having the top of the tape in line with the upper stops, and allowing the lower edge of the tape to extend to the lower end of the zipper tape. The white you see in the photo is the paper backing on the tape.
 Then, I removed the paper backing, and folded the top edges of the zipper tape down as shown in the photo. Do not cut off the extra zipper tape, because it will unravel. Leave it in tact, and just fold it down on the front side of the zipper, being careful so that it is far enough away from the zipper teeth so that it doesn't impede movement of the zipper pull. Since the top part of the zipper tape no longer has any tape exposed, I put another small piece of the double sided tape on top of each part that was folded over (though this part is not shown in the photo).
 Then, I carefully placed the zipper into the opening of my sweater, making sure that all of the critical "lines" (such as the base of the neckband) were lined up, and also making sure that the front edges of the placket opening touch each other. I applied pressure so that the tape somewhat adheres the zipper to the sweater. I will still put in some pins, to hold it all together better, because the tape doesn't exactly "stick like glue", though it is very helpful in keeping things from shifting around too much, and it gives me a good idea of how it's all going to look once it's sewn into place.
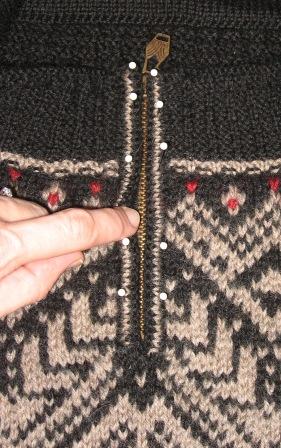 Stay tuned for part two, in which I actually do the sewing, hopefully without any crying, but I'll let you know :-)
Warm regards,
Laura (YarnThrower)
7 comments:
I'm definitely going to have to get some of that stuff. I just pinned my and hand stitched, and it did shift around a bit, requiring me to keep stopping to eyeball everything, so stuff matched on both sides of the zipper. Can't wait to see the sewing.
This is most informative for me. I have never put a zipper into anything. I remember my mom liked the result, but did not like sewing zippers, and so I never learned.
I appreciate your instructions for installing a zipper into a placket. I am knitting a zip-up pullover and will eb using a 9" zipper. Have you ever done a single crochet every other stitch from top of placket - all the way around and back up to the top? I read this makes a clean and even inside edge. When you stitch the zipper in place using the backstitch do you use yarn or heavy thread? My last question! Have you ever used a sewing machine with long stitches to secure a zipper?? Thank you for your help!!
VTwin - Thank you for your comment! No, I have never done a single crochet around the placket edges to make an even edge... I'm interested in hearing more about that. The outside edges on the sweater in this post are very finished off because of the turning ridge that is specified in the Dale pattern for knitting the placket, though there are really no directions for making a "pretty" inside. Once the edges are sewn down, however, it looks okay, especially in such a dark color. I think Dale actually uses some sort of casing sewn over the raw edges, but I haven't explored that idea thoroughly, either...
To backstitch the zipper in place, I use a double strand of standard thread in a matching color.
I have used a sewing machine to secure a zipper in place many times. I typically do this on cardigans, and there is another tutorial link in the sidebar of the http://www.pickinandthrowin.blogspot.com blog which discusses this topic. In fact, using a sewing machine is my favorite way to secure a zipper, and it is also very fast...but once I didn't get it right the first time and had to rip and re-sew...doable, but no fun.
Best wishes with your zipper!
Laura (YarnThrower)
Hey, just happened to read your reply (I wonder why I didn't get a notice in my email....). I have not attempted the zipper yet. I plan to knit an example and practice next weekend while at the ocean. I LOVE it when I find such good help on the www.
For my part every person should read it.
This was absolutely so helpful. But, the zipper that came with the kit is too short. Help! Where can I find one that is about an inch longer?
Post a Comment