Wednesday, September 28, 2011

Time flies!

Greetings, and Dear Laura

It seems like just yesterday that we were in Chicago for Stitches. That was so much fun! Our trip back in rental cars went so well that we've decided to skip the train next year and drive both ways. No more delays and cancellations for us!

Your hubby's Christmas sweater has grown since I saw you. I always love how you calculate needed progress to make goal. It's much more precise than my 'just keep knitting and it will get done' approach.

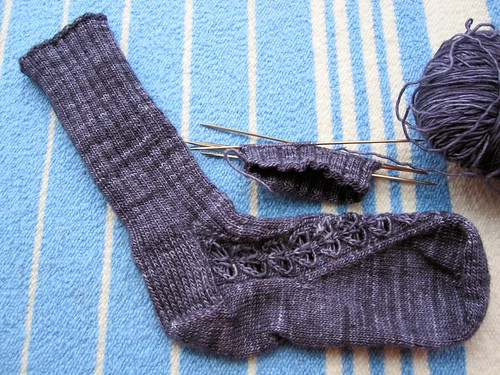
I've been frogging a lot lately. I was working on these socks when I saw you. They were my July project that ran into August. And September. October is looking likely. I was finishing the first foot in August when I noticed a glaring error and had to frog back to the ankle. I did finish that first sock and promptly cast on the second. I was almost to the heel when I discovered that I had switched from 3x2 rib to 2x2 rib. FROG! So I still have most of the second sock yet to go.

Early in September I decided to make a 'quick' pair of socks for my sil Chris. She's been sick for several months now. They've diagnosed a problem with her gallbladder (which took 6 weeks to determine) and now she needs to find a surgeon who will agree with the specialist that it should be removed. In addition, they are installing a new furnace this fall and we have had rather chilly weather here, especially at night. I thought that a pair of worsted weight socks would be quick to knit and help her feel warm and cared for.

I used a Malabrigo worsted with a contrast yarn. At first it went really well. I cast on just before a road trip to a reunion and since I didn't do any driving, I completed the first sock in one day!! I cast on the second sock immediately, but the following weekend we hosted another reunion and knitting time was hard to come by. I got serious about it again the day after the reunion - and that's when I noticed that the almost-completed cuff was in 2x2 rib instead of 2x2 garter rib!!! I evidently have rib issues.

The socks are now complete (and matching!) and warming her feet. Back to the July-August-September-October socks!!

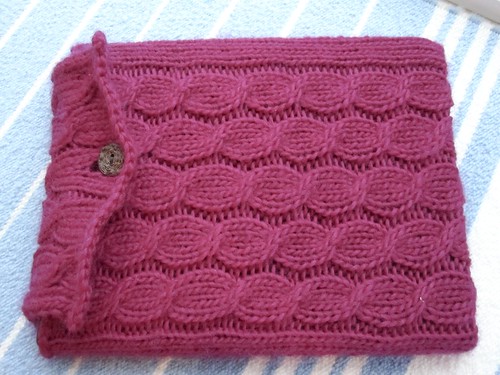
I also want to show off this beautiful iPad2 case that knitting@lunch made for me!! The color is a darker purplier color than it appears and I love it very much. Stylish and cushy at the same time!!

Keep knitting!

Cynthia (aka Designated Knitter )

Monday, September 12, 2011

Knitting for Christmas

Greetings, and Dear Cynthia,

I have some time today to post to the blog. The washer repairman is scheduled to be here sometime between 8am and 5pm, so I am tethered to the house right now waiting for him to arrive.

This is a blessing and a curse. I am forced to catch up on some things here that really need it (paperwork), though I really can't run out even for a moment to take care of any errands until after the repair.
I've been working on a DK weight (size 4 needles) sweater since last February. It follows the basic framework given in Beth Brown-Reinsel's book "Knitting Ganseys." It is very difficult to photograph well.

I am trying to finish it before Christmas as my gift to DH.

Instead of knitting in his initials into the left front lower corner, I knitted our "family logo," which is "circle square triangle," which means "I love you." (Circle is made with one line, just like "I" is spelled with one letter. Square is made with four lines, just like "love" is spelled with four letters. Triangle is made with three lines, just like "you" is spelled with three letters.):
The front bands are rather flimsy, so I'm definitely going to be sewing some grosgrain ribbon along the backside of the bands to make them more robust. I calculated that I will meet my Christmas deadline if I am able to average 8 rows per day on the sleeves.

One other thing - I might run short of yarn. I'll know for sure after this first sleeve is finished. I could order more yarn, but the dye lot would be different, which may or may not be an issue. Crossing that bridge when I get to it, though I'm taking your advice to "knit really fast" when you think you might run out of yarn.

Okay, so back to my other chores! I hope this note finds you all well!

Warm regards,
Laura (YarnThrower)

Saturday, August 20, 2011

Water Bottle Holder/Carrier Sewing Pattern

A pattern by YarnThrower
My family and I enjoy hiking together, and as the mother, I typically end up being the "pack mule" for our little group. One day I thought to myself, "Why am *I* carrying all of the water bottles?" Probably because I was carrying the only backpack in the group...so I started thinking that I should figure out how to get each of my kids to at least carry his own water bottle. After searching online for a pattern to make some water bottle holders/carriers for my kids to use, I eventually developed my own hybrid pattern based on some of the ideas I found.
Inspired mostly by this pattern which utilizes old jeans, and also the idea of reinforcing the strap found in this pattern, my version results in a carrier which is a little bit larger, has a more robust strap, utilizes an actual pocket from a pair of jeans, and is constructed in a way which allows all of the raw edges to be concealed. I made these for birthday gifts for my nieces and nephew, and they were a huge hit! And, the pocket is the perfect place to put a trail map when hiking!

(This pattern is the property of YarnThrower and may not be reproduced except for one copy for individual use. If you print or distribute this pattern without YarnThrower's written permission, you are stealing .)

Materials needed:
  • 4 feet of strapping/belting (shown in the photo as off-white in color, but use whatever color you'd like :-)
  • 4 feet of grosgrain ribbon which is a slightly smaller width than the strapping/belting material
  • 9.5 x 11.5 inch piece of scrap fabric, cut along the grain line
  • 9.5 x 11.5 inch piece of denim (can be cut from old jeans), cut parallel to the grain line, to form the "shell" of the water bottle holder/carrier. (I generally make a cut which goes from top to bottom in one of the legs of the pair of jeans, and then open it up/flatten it out to use as my fabric to cut the 9.5 x 11.5 inch piece)
  • Optional: Pocket carefully removed from pair of old jeans by snipping the threads which are holding it to the jeans
  • Basic sewing supplies, such as coordinating thread (I used white), sewing machine, scissors, needle, pins, etc.
First, center the grosgrain ribbon on the strapping material and zig-zag stitch along both side edges of the ribbon to secure it. I also zig-zagged along the short edges to keep them from raveling:
Here are the shell and lining fabrics already cut to be 9.5 x 11.5 inches:
If you are going to put a pocket on your carrier, stitch the pocket to the shell fabric so that the top of the pocket is parallel to one of the longer edges of the shell fabric, and so that it is centered between the left and right sides of the shell fabric. Allow a space of about an inch between the top of the pocket and the upper edge of the shell fabric:
Next, fold the shell fabric in half, right sides together, so that the shorter sides of the shell fabric match. Stitch along the longer side of the rectangle formed after folding, creating a tube of fabric. Repeat with the lining fabric, EXCEPT leave an opening of 3" in the middle of the seam:
In this next photo, the area between the points of the scissors is the place where the seam of the lining has been left open for 3":Next, adjust the tube of fabric so that when flattened, the seam which was sewn in the previous step runs down along the center, as shown in the photo below. Stitch along one of the ends of the tube. If you have sewn a pocket to the shell, make sure that you stitch along the edge of the fabric tube which is *closest* to the *bottom* of the pocket. Otherwise, the pocket will be upside-down on the finished product. (Ahem, don't ask me how I know this.) Again, I always zig-zag stitch over the raw edges to keep them from raveling:
Now, to add some depth to the bag, fold it/pin it as shown in this photo. You will be stitching a straight line located about one inch away from each of the tips of the little triangles formed by the folding. Confusing? Maybe these pictures will help:
Here's what it looks like after it's sewn:
Trim off the excess little triangles and zig-zag stitch over the edges to secure them (so they don't unravel):
The "shell" of the carrier is done. It has a rectangular bottom and can almost stand up by itself :-) Leave it wrong side out and set it aside for now:
Make a rectangular bottom for the lining using the same method of stitching little triangles, trimming them, and securing the raw edges by stitching over the edges with a zig-zag stitch.Turn the lining "right side out" when done. Here is the finished lining. You can see where the opening is that will be used for turning later on:
Next, take the strap and pin the *right side* of the strap (which is the side the ribbon was sewn onto) to the *right* side of the shell, with raw edges even, and placing the strap *inside* the tube, as shown in the photo:
Now, put the lining into the shell, right sides together, and matching raw edges. Stitch through all thicknesses using 1/4" seam allowance. Here I also zig zag stitched along the raw edges to secure them better. This photo shows it all pinned together (before I stitched it):
After stitching, pull lining fabric out of shell; notice the opening for turning in this photo:
Turn bag right side out by pulling the strap and the denim shell through the hole in the lining:
Whip stitch the opening of the lining closed:
Tuck the lining inside, making a crisp flat edge around the top of the bag as shown and pinning the top edges in place to hold them in position for the next step:
Stitch around top of bag close to upper edge, and again 1/4" in from the edge:
And voila' - your water bottle holder/carrier is finished:
I hope you have fun with this pattern! As always, I'm interested in your thoughts, suggestions, and especially any corrections you may have to the directions I've given.

Warm regards,
Laura (YarnThrower)

Sunday, August 14, 2011

Christmas in August

Greetings, and Dear Cynthia,

Just a quick note...

A friend commissioned me to knit a Christmas stocking for each member of her family:
Pattern is from Blackberry Ridge, but I designed the colorwork in the holly and snowflake sections and also used different lettering in the name band.

Bulky yarn, so they were relatively quick knits at roughly 7.5 hours each.

Gotta run! Lots more to share, including a pattern I devised for making a water bottle carrier out of old jeans... Stay tuned...

Warm regards,
Laura (YarnThrower)

Tuesday, April 19, 2011

All Done!

Greetings, and Dear Cynthia,

Well, life has been a blur for the past 12 weeks. I was affiliated with an outpatient neuro PT clinic, and it was really a great experience for me. We saw lots of patients with dizziness, some folks who were post stroke, some post traumatic brain injury, some with Parkinson's disease, etc. Very interesting! With that now behind me, I have a few weeks to catch my breath, and also catch up with other things I've been neglecting (the list is long). I *did* actually finish the red sweater. Recall that this is the *third attempt* at using this yarn after ripping out two other versions of sweaters prior to this. Introducing my new favorite sweater:
The pattern is "Twist" by Chic Knits, and I love it. The photos aren't that great, taken outside with hopes of better lighting, but because the weather is...well, don't get me started on the weather. Today temps are hovering around 32 degrees, and we had snow falling for much of the morning. It just doesn't seem right for April 19th...
In other news, last Friday I met all of the requirements for my degree in Physical Therapy. This has been a long haul, and all day Friday I just couldn't stop smiling. I still have to take a national board exam, and there's the whole *job* thing, but it feels really good to have the degree piece of this wrapped up!

That's the big news! I've got other knitting on the needles, including a sweater project I've started for Christmas. (What?!) Yep, I'm actually knitting a Christmas sweater and started it *before November,* a new strategy for me :-) More on that later!

I hope this finds you having a great day!

Warm regards,
Laura (YarnThrower)

Tuesday, February 22, 2011

Another sock already?

Greetings and Dear Laura:

I didn't used to have SSS.* I remember when I first started knitting socks, I knitted complete pairs all of the time. I had at least 5 or 6 pairs to wear at any given time! I don't know what happened to me, but the last few years I have not knitted many pairs of socks, and I've struggled with the second sock each time. It was just grit and determination that got me through the second hexagon sock last summer. I did the first Norwegian Rose sock pretty quickly, but I didn't do the second one until 6 months later. I have 2 socks currently in my UFO's - two different socks, so I have the first of each partially done.

And now I'm trying to knit a pair each month! Yikes!

I didn't finish the second Norwegian Rose sock until Feb 10th, at which point I realized that I had 18 days left to knit a pair. That meant 9 days per sock. (Not really 9 days - I cast on at 10:30 on the 10th, so that wasn't much of a day!) The first sock took me until the 22nd to finish, and today I cast on for the second sock. I got 4 of the 8 rows of ribbing finished during lunch, which isn't really much.

And I'm really not feeling the love for this second sock. I just DID this sock!
Maybe I'll love it more if I knit it fast and get it over with?

Yes Lauren, you can pick a project for March. Just don't tell me about it until I get February done, ok??

Also, what's with the ice? And snow?


Keep knitting!

Cynthia (aka DesignatedKnitter)
*Second Sock Syndrome

Monday, February 07, 2011

Thank you!

Greetings and Dear Laura:

Thank you, thank you for the beautiful mittens that you sent! I love them – they are cozy and warm and pretty AND they are in my current-obsession-color – light green! What a happy day at the mailbox!

Congrats on last night’s big win by the Packers. My brother has always been a Packers fan and his wife has always been a Steelers fan (talk about your mixed marriage!) and so I tried to stay as neutral as possible. However, there was a drawing at work and I had to pick one or the other to put my name in and so I went with the Packers. I ended up winning a $20 gift card to Buffalo Wild Wings – so YAY PACKERS!!

Thank you to Cindy G for your comment on my last post. I’m still finding projects to package together, and I’m way past 12 – there are currently 21 projects in the basket and I have 3 or 4 more waiting to be printed and packaged. I don’t know if you noticed my copy of “A Cuff Above” in the picture, but I have two projects from it in the basket – the cover socks, and the Lucy Anklet socks. I spent quite a bit of time at Stitches Midwest last summer, choosing the perfect yarns for the cover socks, so I hope they get pulled out of the basket soon!

Since I want the choosing process to be random, I asked my mom to visit the stash and pick a bag. My February project will be Spud and Chloe socks in a medium-blue Spud and Chloe yarn! And as soon as I finish the last 20 or so rows of the Norwegian Rose socks (groan!) I’ll be casting on for those. Meanwhile, I put each project in my Ravelry Queue with the tag ‘2011Project’ so to facilitate allowing others to choose for me remotely. Watch this space for opportunities to ‘boss-me-around-about-knitting!’

Lea-Ann commented about Kitchener on a fingerless mitt project. That is indeed what it was. Nancy made them from the Not Just More Socks book, (Ravelry link) and they are knit flat, sideways, and then grafted together. They are very cute!

In other news, how bad is it that I haven’t knit an inch of my yarn from Stitches Midwest 2011 but all I can think about is saving up for Stitches Midwest 2012??
[sigh]

Keep knitting!
Cynthia (aka Designated Knitter!)

Saturday, January 29, 2011

I posted! And I kitchenered!

Greetings and Dear Laura:

We'll need to take a minute to let you and Knitting@Lunch and any other loyal readers recover from the shock of it all. Here's a picture of some yarn while you catch your breath.......


I have been enjoying reading your posts tho. You make such beautiful sweaters, and I'm always impressed with how many you actually finish. And the Heilo mittens look great - altho that post gave me a scare. When I read about the proposed changing the name of the blog, I thought you might be going to drop the Pickin' since I post so rarely! Whew!


Anyway, I would surely not object to "Pickin' and Throwin' and Rippin'" after my struggles with my February Lady cardigan. However, once I got past that evil instruction to - well, let's just post it here.

Eyelet increases (RS): k7 (10, 8, 8, 8, 10, 14), pm. Work 41 (38, 47, 41, 41, 38, 39) YOs spaced

evenly among the 197 (207, 219, 239, 267, 291, 311) center stitches, pm, k7 (10, 8, 8, 8, 10, 14).

[252 (265, 282, 296, 324, 349, 378) total stitches] (Some knitters have made the pattern less

swingy by decreasing the number of increases here. Others have left the increases off the

sleeve stitches, to make narrower sleeves. Knit it to fit you! See “notes on sizing” below.)

Seriously? That one - I think on the 4th or 5th try I figured it out, and it had to do with adding some 'fake increases' so that it worked out. (None of those numbers divide evenly into each other!) But that was a long time ago, and I've been plugging away on the lace body, and it turns out that eventually you get near the end. Who knew? Another couple of lace repeats and 2" of garter border and I'll be ready to move on to the sleeves.


My goal for this year is to make 12 projects out of stash yarn for me! Mostly socks/sock yarn, but there are a few other projects as well. The picture at the top of this post was the pairing of yarn and patterns, which I finally got around to this weekend. I had been collecting the patterns and choosing the yarns from my Ravelry, but it remained to do the actual packaging. Now I'm all set - there are actually 18-20 projects in the basket. Later this week I can randomly pull out one for February!


For January, I had decided to work on a UFO, since it was getting later in the month. Last week I worked on the second sock of the Norwegian Rose pair that I worked on last summer. Remember the 1st sock was displayed at Stitches, in the Knitting Today booth?


I had most of the foot of the other sock done, and I'll finish turning the heel yet this evening, so it should be done soon. However, last night it occurred to me (!) that it wasn't going to make it by the end of January, so I grabbed a chunky stash yarn and made a quick hat for myself. I've had the yarn for a while, and a hat is what I intended and needed, so that was a win!


Well, that's a good update from here - oh wait! I mentioned that I Kitchenered, didn't I?? (I believe that my long-standing aversion to Kitchener grafting is well documented over the life of the blog.) Knitting Today got a shipment of these really cool keychains that document the anatomy of a sock, and brief instructions for grafting the toe. (I know that it isn't complicated, but I always manage to get confused part way through.) It was cute and colorful and I'm a real sucker for such things, so I picked one up for my notions bag.


Last Thursday, Sweater Night was cancelled and so a few of us met at Starbucks. (Much less driving in the snow!) As I got out of the car, I realized that I had left my knitting on my desk, and so I had nothing to do. Nancy generously offered to let me graft together a fingerless mitt that she had. I was bored enough that I agreed (I did barter for a double-chocolate frapa-thingy) and I got out my little keychain. It was very useful! It was so brief that I was able to keep track of where I was, and we were both pleased with the result. In fact, Nancy borrowed it to graft the second mitt and reported that it worked really well for her as well. So, those of you who are intimidated by Kitchener - get yourself to the Knitting Today store or website and get one of the magic "Grafting Lucky Charms!


Whew. Anyway, we both have a goal for 2011 knitting!


Keep knitting!


Cynthia (aka Designated Knitter!)


Tuesday, January 18, 2011

Valentine Craft - woven felt hearts

Greetings and Dear Cynthia,

This is not an original idea, though I don't recall ever running across it actually in print, so I thought I'd share this fun craft with you.

These are little heart pockets made out of felt:
The tops open up and can hold a treat inside!

They may be made any size. The pattern piece I use is four inches wide and six inches tall. The key is to start with a square (I started with a four inch square), and add a half circle to one side of it. Then draw two lines evenly spaced which are the length of one side of the square (as shown in the photo):
This pattern piece is placed on the fold of a piece of felt. I use two pieces of different colored felt. (I get the pre-cut felt which is 9x12 inches; I am able to make two hearts with these two pieces of felt.)

Cut around the pattern piece and also cut along the lines. For a heart having larger woven squares, cut on only the two lines; for a heart having smaller woven squares, bisect each of the "legs" with an additional cut. Here is what the felt pieces look like after cutting them out and opening up the fold; these pieces will make a green and gold heart having the smaller woven squares:
Weaving the first row can be tricky, until you "see" how things are supposed to be working. It's difficult to explain with words, though hopefully you will be able to figure it out from the pictures. For big woven squares:
For little woven squares:
First row completed:
Moving on to the second row:
...and the third row:
Heart with big woven squares with weaving completed:
Weaving in the final (sixth) row of the heart with small woven squares:
A look at the inside after weaving is complete:
Add a little hanger (I just took a piece of long/narrow rectangular felt and used a hot glue gun to attach it to the top of the heart, one end on each side so that it still opens up to be able to hold a little treat inside):
Of course, you may not fancy a green and gold heart (not a Packers fan?), so enjoy creating your own color combinations!

Warm regards,
Laura (YarnThrower)