I'll never forget talking with one of the authors of a pattern book for extremely cute children's sweaters. She said that if a pattern calls for a zipper, she won't even consider it. Since most directions I've encountered for inserting zippers say something like, "Sew in zipper", I felt there was a need for a tutorial for knitters who want to install zippers. People who sew clothes often have a bit of training and experience with zipper insertion, but it might be a little bit harder for knitters...
I am going to share with you a method for zipper insertion which I developed as I sewed zippers into more than half a dozen handknit sweaters over the years. Since I learned to sew long before I learned to knit, my method employs some of the techniques I learned in various sewing books and classes, though I've adapted the techniques to apply them to handknit items.
The sewing may be done by machine, or by hand. It all depends on the garment, the presence or lack of a sewing machine, and/or personal preference.
A zipper that is going to be used in a cardigan must be able to separate, and the zipper package will say "separating" someplace on it.

Often I will plan my knitting so that the front opening will be just the right size for a "standard" zipper length, typically 18", 22", 24", etc. If I finish the sweater and discover that my opening isn't quite the same as a standard zipper length, then I'll purchase a zipper slightly shorter than the opening. (Generally over time and with wear, my handknit sweaters get a little bit wider and shorter...so it is better to have the zipper be slightly shorter than the front edge rather than longer. Sometimes the front edge may be "eased" a little bit into a shorter length zipper...or, the zipper can begin and end half inch from the top and/or bottom of the sweater. (I haven't had much luck with shortening cardigan zippers... It either gets too bulky having the zipper coil turned back on itself at the top of the zipper, or if the excess coil is cut off, then I worry about the zipper tape unravelling.) When selecting a zipper, if I can't find an exact color match, I'll go a little bit darker, or I'll go with something neutral, such as black or navy to go with darker colors, etc.
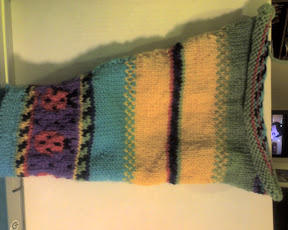
For my Murphy sweater, my opening is about 22", though I couldn't find a very good match to the blue, so the zipper I purchased was 22" long, navy, and separating. (Note that there are also choices for zipper style, such as sport versions having large plastic teeth, or coiled teeth, or metal teeth, etc. These are all a matter of personal preference. Most critical is getting the right length, color, and that it will separate.)
I prepare the zipper for installation. I almost always use
this tape (Wash-A-Way Wonder Tape).... It is not necessary, but I find that it is helpful.

Place a length of the tape along the outside edges of the right side of the zipper. Here the zipper is shown with the tape still having the paper backing on it.

With the zipper still zipped, remove the paper backing of the tape, and fold the top edges of the zipper tape down to overlap the top front of the zipper, making sure that the part which is folded over will not interfere with the movement of the slider.

I generally put another piece of the double sided tape along each of the edges which have just been folded over.

(Note: Do not cut off the excess zipper tape. It is typically woven, and it will unravel. Once the zipper has been sewn in, it will barely be noticeable.)
With zipper still zipped, align each cardigan front edge with the zipper tape, taking care to position the front edges of the cardigan where you want them to be. (Sometimes you want the zipper to be seen when it is zipped. Sometimes you want the zipper to be hidden when it is zipped. For the latter case, there will probably be some sort of special treatment on the front edges, such as a folded over placket, or an I-cord knit in, which will form the portion which will cover the zipper.) For my Murphy sweater, the front edges are made up of garter stitch which is two stitches wide. This particular stitch does not lend itself well to covering over a zipper, so I will be sewing my zipper in so that the zipper teeth will be seen when the zipper is closed. Also, this is how it is shown in the magazine photo.
When placing the zipper into position, it is also critical that any horizontal "lines" inherent in the garment match up. For instance, in my Murphy sweater, I want the part where the collar is attached to line up, that is, to be in the same position on the right side as it is on the left side. Similarly, the top edges should line up, and the bottom edges should line up when the zipper is closed. (The horizontal white strips shown in this next photo mark the places in which alignment is critical.) This photo shows the zipper taped in place, though I've added some stick pins to hold it together, too.

Specific to this project, as I'm placing the zipper into my Murphy sweater, I am positioning the knitted fabric so that it is almost next to the zipper teeth (though not so close that it will interfere with the movement of the slider), and taking care so that the base of the collar on the left side lines up with the base of the collar on the right side. My Murphy sweater has a collar facing which will be folded over after the zipper is inserted, so I will align the top edges of my zipper to a position just below the fold line of the collar. Finally, I will make sure that my bottom edges are all even, too.
Press down firmly on the taped areas to allow the tape to adhere well. (If the assembly is allowed to sit for a few hours, the tape seems to become a bit tackier and adheres better. However, this also will make it be a bit "gummy", but for me, it is a small price to pay for the "help" in holding things together better.) Carefully unzip the zipper. I generally add many pins to keep the zipper/garment properly in place.
(Now a word about machine sewing versus hand sewing the zipper into place. Any zipper may be sewn in by hand. Only certain zipper installations allow for sewing in by machine. If the zipper is going to be hidden by a folded over or I-corded front edge, it will probably work best to sew by hand, since you don't want the machine stitching to ruin the look of the folded over facing, etc. An example of this can be found
here. (Scroll down to the bottom of the linked page.) If the zipper isn't going to be hidden, and if the front edges of the garment have a bit of texture, such as seed stitch or garter stitch, then if a nice matching thread is selected, the zipper will lend itself well to being sewn in by machine. The stitches **may** be detected if studied closely, but for the most part, they are very difficult to see. These next photos illustrate this - all of these zippers were sewn in by machine, yet it is extremely difficult to see the lines of stitching.)


(One drawback of machine stitching is that it may be more difficult than hand stitching to remove if any adjustments are required in the zipper installation. A couple of advantages, however, are that machine stitching is quite fast, and also very secure.)
Sew a stitching line on each side of the zipper as close to the front edge of the fabric as the garment allows. For my Murphy sweater, I sewed about 1/8" away from the edge of the knitting. I sewed mine using a sewing machine, standard straight stitch (2.5mm), though a longer stitch length (3.0 or 3.5mm) may be better for bulkier knits. If sewing by hand, use a backstitch, being careful to keep stitches from showing on the outside of the garment. (The following diagram illustrates how to do backstitch.)

For machine sewing, stitch again about 3/16" away from first stitching to secure outside edges of zipper tape. For hand sewing, secure zipper tape by using a hem stitch to attach it to the garment along the edges.
At this point, feel free to cover the inside of the zipper with your choice of trim. I've never used any sort of decorative covering over my zippers, because I think that if the zipper tape edges are secured neatly by hemming them in place, it already has a very clean finish...but using a nice trim to hide the inside of the zipper might be fun. Again, make sure to keep the edges of the trim far enough away from the zipper teeth to allow free movement of the slider.
For my Murphy sweater, I folded down the collar facing, and used matching thread to secure the front edges of the facing to the zipper tape, again making sure the slider moves freely.

Now I'm ready to complete the rest of the sweater!
Feel free to let me know if any of this is confusing, or if anything is missing, or if you've found this information helpful, or if you have a better idea! Have fun!
Warm regards,
Laura (YarnThrower)

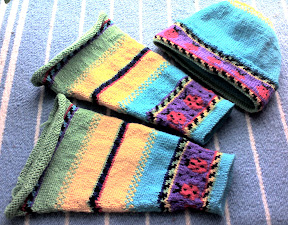
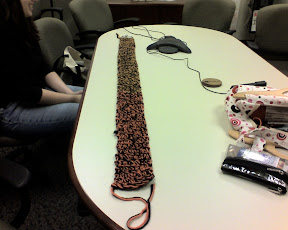
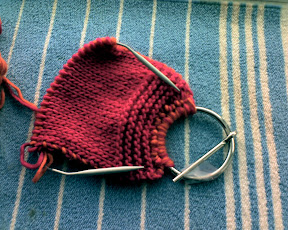
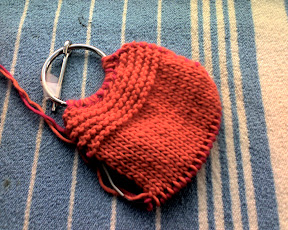
 Here is exhibit A: a ski band I started on Sunday.It is a pattern from Knitter's, Winter 2002 (K69), except the pattern calls for stockinette in the center area, and am knitting in a cable, instead. I've loved the look of the xo cable for some time now, and decided to try it for myself. I'm using an extra hank I have on hand of Classic Elite Lush (Angora Wool), because it is soooo soft and won't make my head itch when I wear it. Very fast, so should be done in no time....except for the KAD thing...
 This is the Leaf Lace Shawl, and I am loving this yarn for this project. I'm making the larger size (45 inches from neck to center back point, 90 inches across the top). The yarn is merino, between sport and dk weight according to the vendor, hand painted, from Briar Rose Fibers. I purchased 1500 yards of it, all in one hank, at the Wisconsin Sheep and Wool Festival last fall. (This probably all sounds familiar, because I was trying to make a sweater out of it before I ripped it back all the way and started on this.) Anyway, to achieve my desired length, the pattern specifies between 150 and 180 rows for this weight of yarn (I'll just knit enough repeats until I think its big enough), and I currently have 132 rows completed, and since this follows the laws of shawl math, it means I am anywhere between 77 percent and 54 percent done... It's a great shawl pattern, pretty, and not too complicated. I'm using the note card method which Allison shared on her blog some time ago for keeping track of rows when knitting lace. I made one notecard for each right side row (wrong side rows are purled across), and after I'm done with the row, I just flip to the next card. (Since I'm into the math thing, I also jot down on each card the number of the row which I completed...because, you know, I like to keep track of that....along with the number of stitches I should have after each row...)
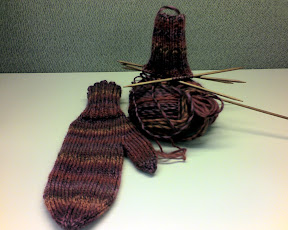
 This is my "portable" project, travelling with me to have the car worked on, piano lessons, library story time, etc.....